15 Stunning Cozy Bedroom Aesthetic Fairy Lights Decor Tips
You know that feeling when you walk into a room and immediately feel… cozy? Like you’ve been wrapped in a warm hug? Yeah, fairy lights do that. I’m obsessed with how a simple string of tiny lights can completely transform your bedroom from “meh” to “wow, can I live here forever?” And honestly, if you’re not using fairy lights in your bedroom yet, you’re missing out on one of the easiest and most affordable decor upgrades ever.
I’ve spent way too much time (and money, oops) experimenting with different fairy light setups in my bedroom, and I’m here to share everything I’ve learned. From creating a starry night vibe to setting up the perfect reading nook, these 15 tips will help you turn your bedroom into the cozy sanctuary you’ve been dreaming about. Ready to get started? Let’s make your space Instagram-worthy without breaking the bank.
1. Starry Night Fairy Light Bedroom
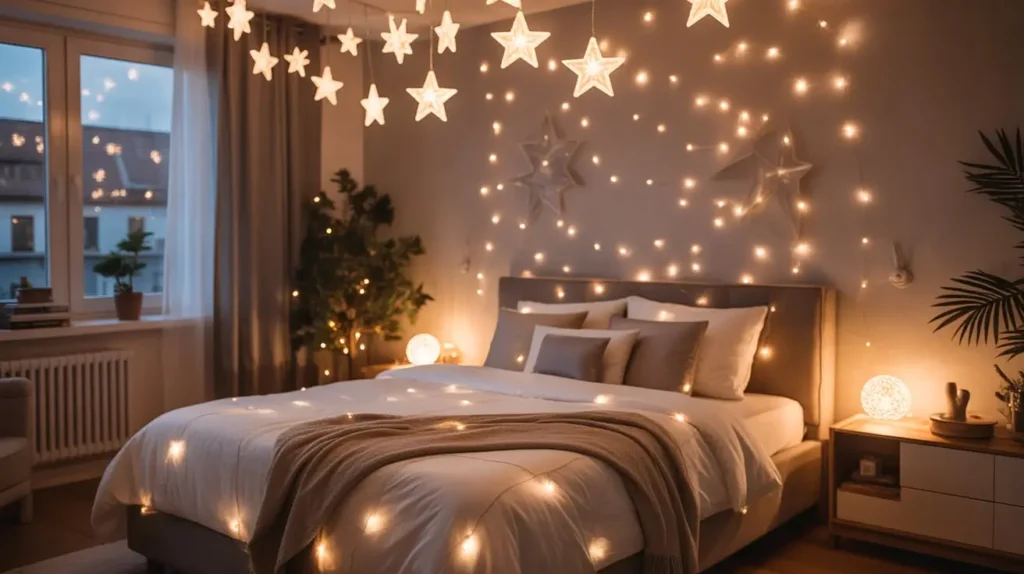
Ever looked up at the night sky and wished you could bottle that magic? Well, you basically can with the right fairy light setup. I’m talking about creating your own personal planetarium right above your bed.
The trick here is distribution. You don’t want all your lights clustered in one corner—you want them scattered across your ceiling like actual stars. I use tiny adhesive hooks (the damage-free kind, because my landlord would kill me otherwise) to create a cascading effect. Start from one corner and work your way across, varying the heights and density.
Pro tip: Mix warm white and cool white fairy lights to mimic real stars. Some stars appear bluish, others yellowish, right? This subtle detail makes the whole setup look way more authentic. Trust me, lying in bed under your DIY starry sky hits different—it’s like camping, but with better pillows.
Want to take it up a notch? Add some glow-in-the-dark star stickers between your fairy lights. When you turn the lights off, you get this dreamy transition that’s honestly chef’s kiss.
2. Minimalist Warm Glow Setup
Okay, so not everyone wants their bedroom looking like a Christmas explosion (no judgment if you do though). Sometimes you want that clean, minimalist vibe but still crave that cozy warmth that fairy lights provide.
For this look, I swear by a single strand of warm white lights. That’s it. One well-placed string can do wonders. I draped mine along the top edge of my headboard, letting it fall slightly behind so you get this soft backlighting effect. The lights aren’t the focal point—they’re supporting actors that make everything else in your room look better.
The beauty of minimalist lighting is that it doesn’t overwhelm your space. You get ambient lighting that’s perfect for winding down without turning your bedroom into a disco. IMO, this setup works killer for anyone who gets overstimulated easily or just appreciates clean aesthetics.
Keep the wire color neutral (copper or white usually works best), and skip the flashing modes. Steady, warm glow only. Simple doesn’t mean boring—it means intentional.
3. Boho Chic Fairy Light Corner
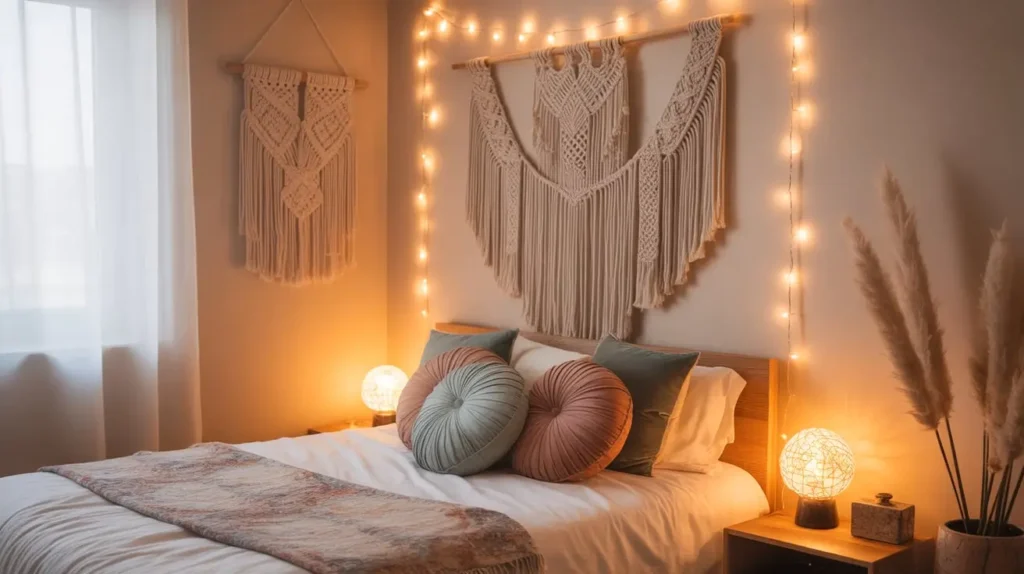
If you’re into that bohemian, free-spirited aesthetic (macramé and pampas grass everywhere), fairy lights are basically mandatory. I created this cozy boho corner in my bedroom, and it’s become my favorite spot in the entire apartment.
Start with a tapestry or woven wall hanging as your base. Then weave fairy lights through it—not perfectly, just naturally, like vines growing through a garden. Add some plants (real or fake, I won’t tell), maybe a floor cushion or pouf, and boom—instant meditation corner.
What makes this setup special is layering different textures:
- Macramé or woven textiles
- Soft, warm fairy lights
- Green plants for that earthy vibe
- Maybe a rattan mirror or basket
The fairy lights soften everything and create this warm, inviting glow that makes you want to sit down with a journal and contemplate life. Or scroll TikTok. Either works.
I hung mine around a dream catcher above my reading chair, and the way the light filters through creates these gorgeous shadows on the wall. It’s giving enchanted forest vibes, and I’m here for it.
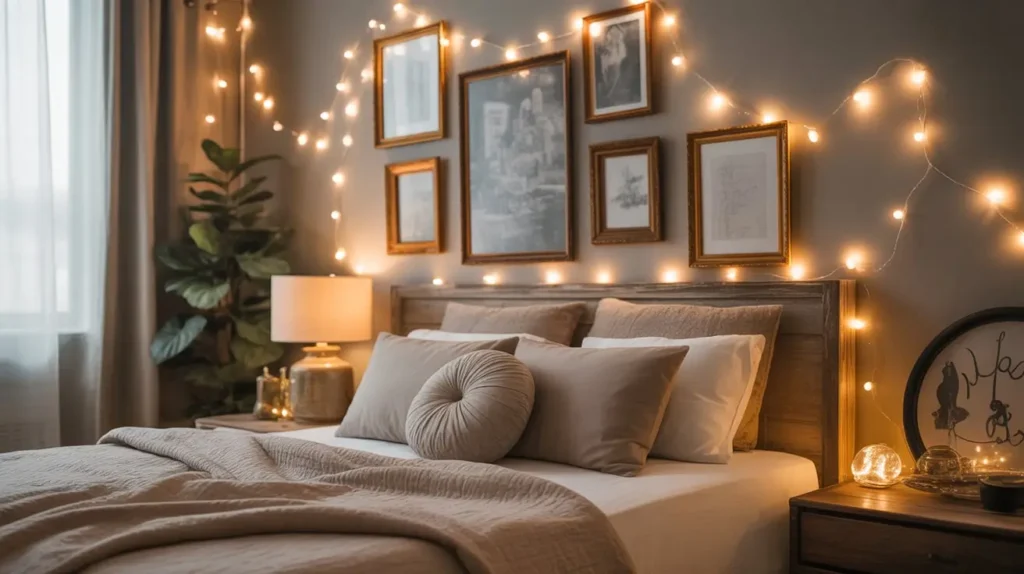
4. Hanging Photo Memories with Lights
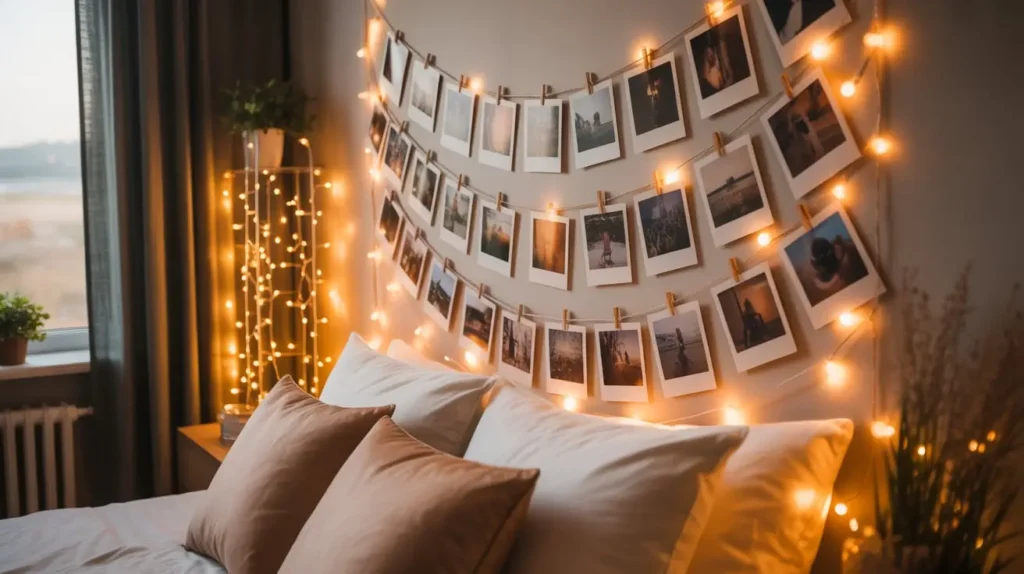
Real talk: photo frames are great, but they take up space and feel kinda permanent. Want something more flexible and way cuter? String up your memories with fairy lights.
I grabbed a long string of fairy lights and some mini clothespins (you can find these at any craft store for like three bucks). I hung the lights horizontally across my wall and used the clothespins to attach my favorite photos, postcards, and Polaroids. Every time the lights are on, my memories literally glow.
This setup is perfect because you can switch photos whenever you want. New concert ticket? Clip it up. Vacation photos? Rotate them in. It’s like a constantly evolving gallery wall that doesn’t require hammering holes everywhere.
Here’s what you need:
- One or two strings of fairy lights (depending on your wall size)
- Mini wooden clothespins or clips
- Your favorite photos, postcards, or memorabilia
- Adhesive hooks or nails for mounting
The lights add this nostalgic warmth to your photos that regular frames just can’t achieve. Plus, it’s a major conversation starter when people come over. Everyone always asks where I got the idea 🙂
Also Read: 15 Elegant Aesthetic Posters for Bedroom and Minimalist Style
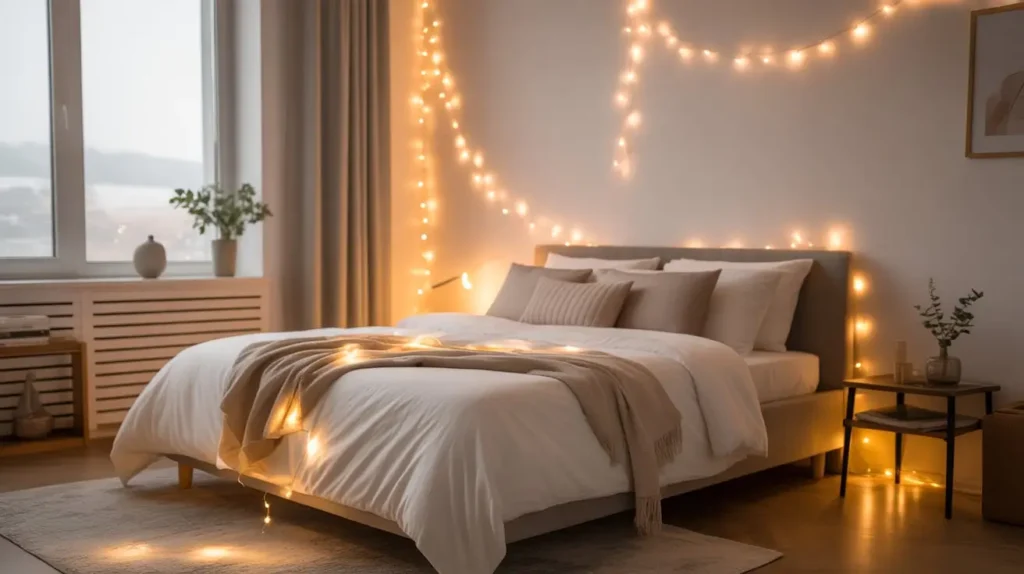
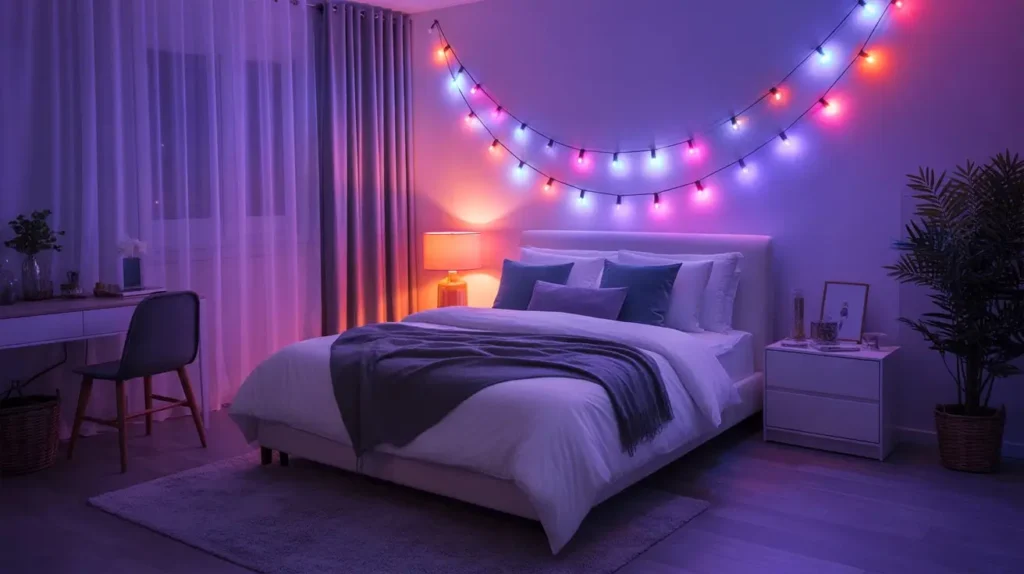
5. Curtain Fairy Lights Over Bed
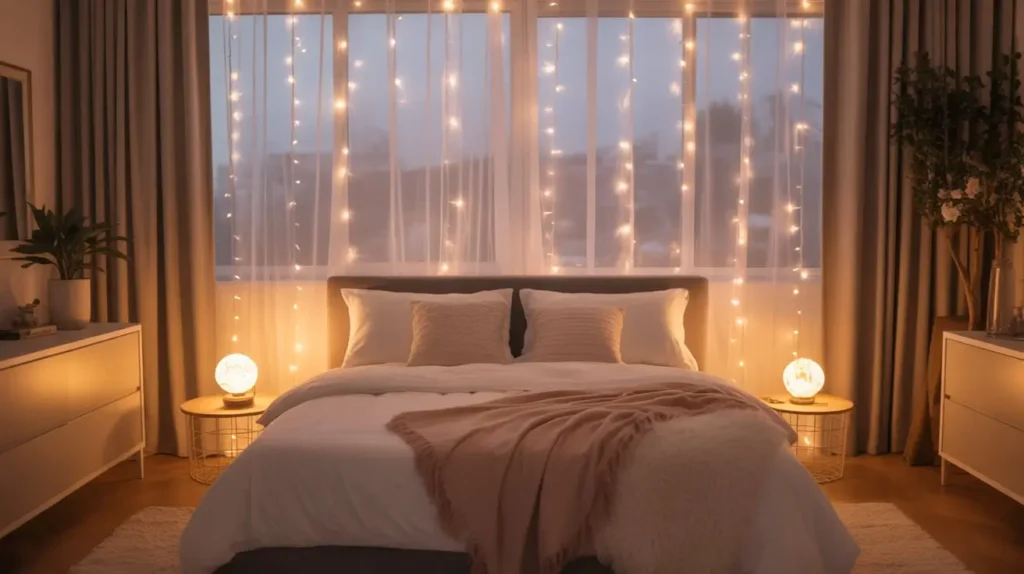
If you want drama (the good kind), curtain fairy lights are your answer. These aren’t your basic string lights—we’re talking about cascading curtains of tiny lights that create this waterfall effect.
I hung mine from a curtain rod mounted just above my headboard, and let me tell you, it completely changed my bedroom game. When you turn them on, it looks like you’re sleeping behind a shimmering waterfall of light. Romantic? Absolutely. Extra? Maybe. Worth it? 100%.
The key is getting the right length. Measure from where you’ll mount them to where you want them to end—I like mine to just touch the top of my mattress. You can let them hang straight for a clean look, or bunch them slightly for more texture and depth.
Installation tip: Use a sturdy rod or rail because these curtain lights can be heavier than regular fairy lights. I learned this the hard way when my first setup came crashing down at 2 AM. Not fun.
You can also tie sections of the curtain back with ribbon or hooks to create this swooped effect, like you’re living in some fancy boutique hotel. Your bedroom, your rules.
6. Canopy Bed Fairy Light Ambience
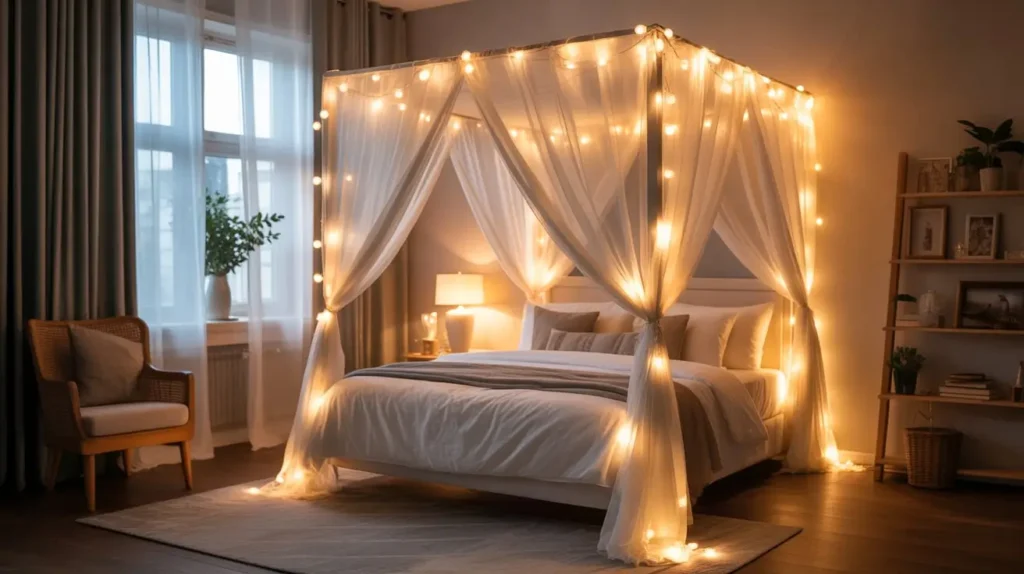
Ever wanted to sleep in what basically feels like a magical fortress? A fairy light canopy delivers exactly that vibe. I don’t even have a fancy canopy bed frame, and I still made this work.
You can create a DIY canopy using a hula hoop (seriously), sheer fabric, and fairy lights. Hang the hoop from the ceiling above your bed, drape fabric over it, and weave lights through the fabric. Instant princess vibes, even if you’re in a tiny apartment like me.
If you do have a four-poster bed or canopy frame, you’re already halfway there. Just wrap fairy lights around the posts and across the top. I like mixing the lights with some greenery (fake eucalyptus works great) for this enchanted garden look.
The magic happens when you’re lying in bed and looking up. The lights through sheer fabric create this soft, diffused glow that’s incredibly calming. It’s like sleeping under the stars, but cozier and with zero bugs.
FYI, this setup also works amazing for creating a separate “zone” in a studio apartment. The canopy with lights helps define your sleeping area and makes the space feel more intentional.
7. DIY Mason Jar Fairy Lamps
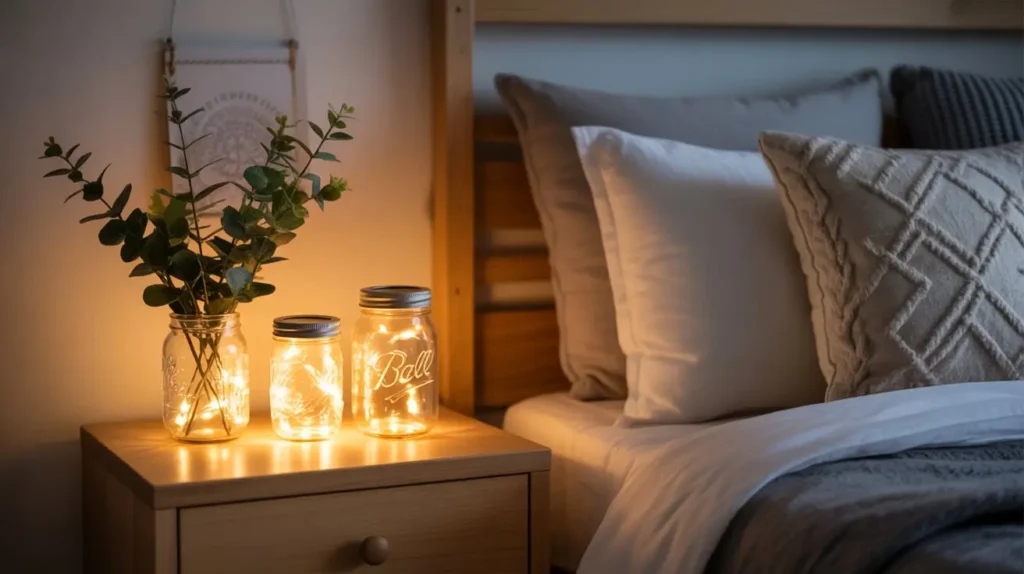
Okay, this one requires like five minutes of effort, but people will think you’re some kind of crafting genius. Mason jar fairy lamps are adorable, customizable, and stupidly easy to make.
Grab some mason jars (any size works—I use a mix), battery-operated fairy lights, and whatever decorative elements you want. I’ve filled mine with fake snow for winter, sand and shells for summer, and currently, they have tiny pinecones and cinnamon sticks because fall vibes never leave my bedroom.
Here’s how you make them:
- Coil battery-operated fairy lights inside the jar
- Add your decorative elements around the lights
- Close the lid (or leave it off for easier battery access)
- Place them on nightstands, shelves, or windowsills
The lights shine through whatever’s in the jar, creating different effects depending on your fill material. Clear or translucent items work best—think sea glass, colored marbles, or even colorful paper stars.
I have three jars on my dresser that I change seasonally. It takes zero effort to maintain, costs next to nothing, and adds this handmade, personal touch that you just can’t buy from a store. Plus, the warm glow from multiple jars creates amazing ambient lighting.
8. String Lights Around Bookshelves
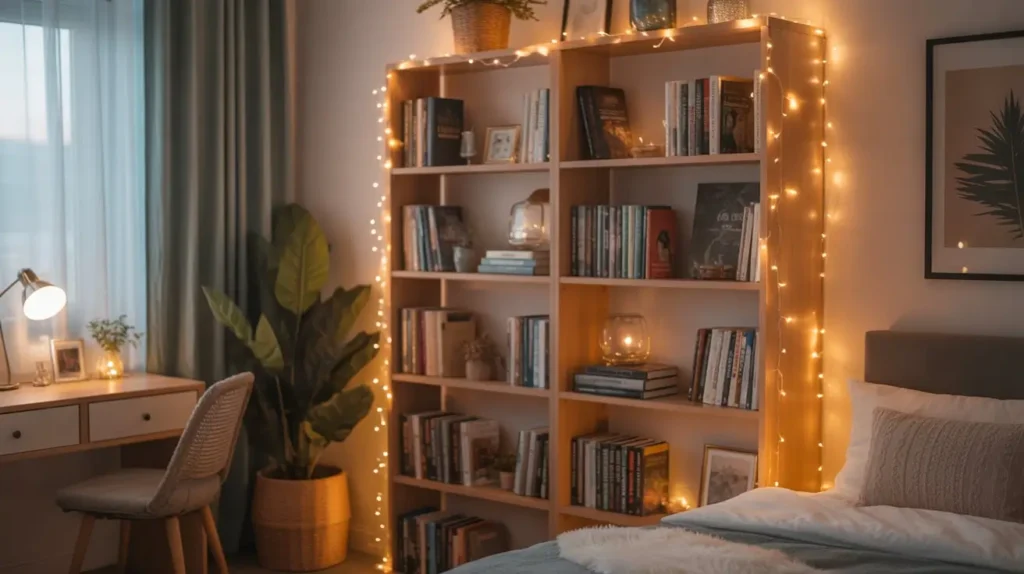
Book lovers, this one’s for you. If you have bookshelves in your bedroom (and honestly, who doesn’t?), you’re sitting on prime fairy light real estate.
I weave thin fairy lights through my bookshelf, tucking them behind books and letting them peek out here and there. The lights highlight your book collection and create this cozy library vibe that makes you actually want to read instead of scrolling your phone before bed. (Okay, I still scroll sometimes, but at least the intention is there.)
The trick is to make it look organic, not forced. Don’t line your lights in perfect rows—that’s boring. Let them meander. Drape them over books, wind them around bookends, let them cascade down the sides of shelves.
Styling tips for bookshelf lighting:
- Use warm white for a classic library feel
- Tuck lights behind decorative objects for backlighting
- Let some strands hang down slightly for a relaxed look
- Mix lights with small plants or photos for visual interest
This setup also solves the “I want to read but the overhead light is too harsh” problem. The fairy lights provide enough illumination to find your book while keeping the vibe chill and cozy.
9. LED Strip + Fairy Light Combo
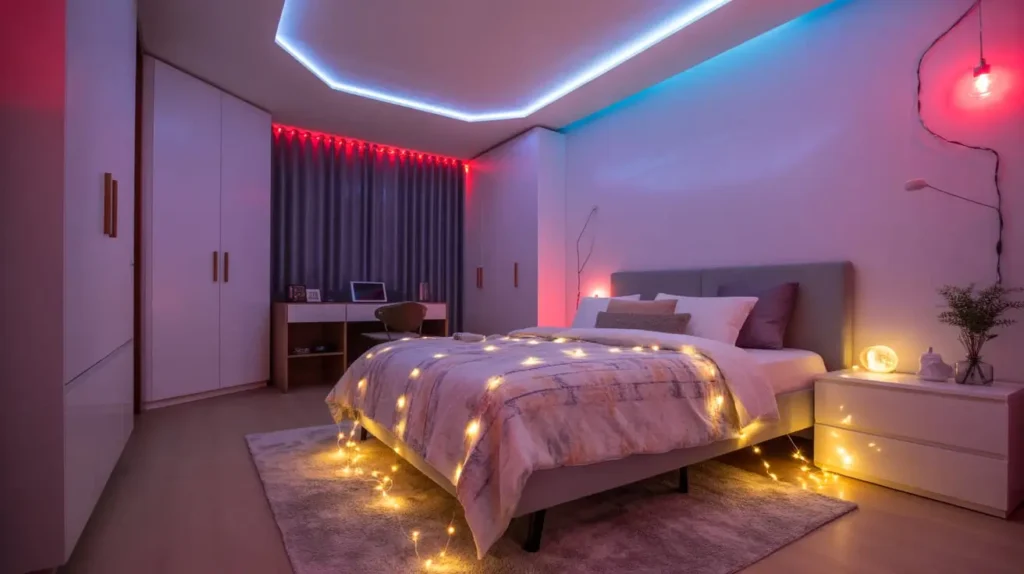
Why choose between LED strips and fairy lights when you can have both? I combined these two lighting types, and the result is honestly next-level.
LED strips give you that modern, color-changing capability and clean lines, while fairy lights add warmth and texture. I installed LED strips along the top of my wall (behind a small lip so you only see the glow, not the strip itself) and then added fairy lights in strategic spots—around my mirror, along my headboard, around window frames.
The combo lets you completely control your room’s mood. Want to focus? Cool white LEDs with minimal fairy lights. Need to relax? Warm LEDs with all the fairy lights on. Feeling moody? Purple LEDs with twinkling fairy lights. The customization is insane.
Here’s my current setup:
- LED strips: behind headboard and along top of walls
- Fairy lights: around mirror, across one wall, and on nightstand in a jar
- Remote controls for both (because getting up to adjust lights? Not in this economy)
The depth this creates is incredible. You get background ambient lighting from the LEDs and focused, warm spots from the fairy lights. It’s like professional mood lighting, but you DIYed it.
10. Cozy Reading Nook Lighting
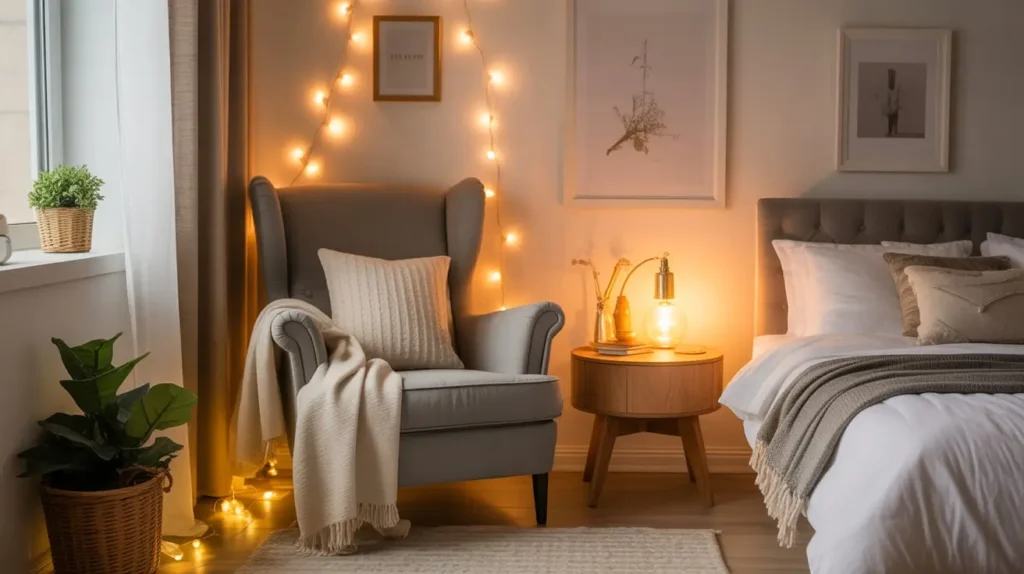
I’m low-key obsessed with reading nooks, and fairy lights are essential for creating that cozy, curl-up-with-a-book atmosphere. Even if you don’t have a dedicated nook, you can create one with the right lighting.
Find a corner—any corner will do. Add a comfortable chair or floor cushions, a small side table, maybe a blanket. Then comes the magic: layer your fairy lights. I draped one strand along the wall behind my chair in a loose pattern, added another around the window nearby, and put a mason jar lamp (see tip #7) on the side table.
The layered lighting creates this cocoon effect that makes you feel wrapped up and safe. It’s bright enough to read by (especially if you add a small reading lamp), but soft enough to help you unwind.
Why does this work so well? Because you’re creating a dedicated space with its own lighting ecosystem. Your brain starts associating that lit-up corner with relaxation and reading, making it easier to actually stick to your reading goals instead of just saying you’ll read more.
I’ve read more books in the three months since I created my fairy-lit reading nook than in the entire year before. Coincidence? I think not.
Also Read: 15 Inspiring Bedroom Inspo Aesthetic Styles You’ll Love
11. Moon & Cloud Themed Fairy Lights
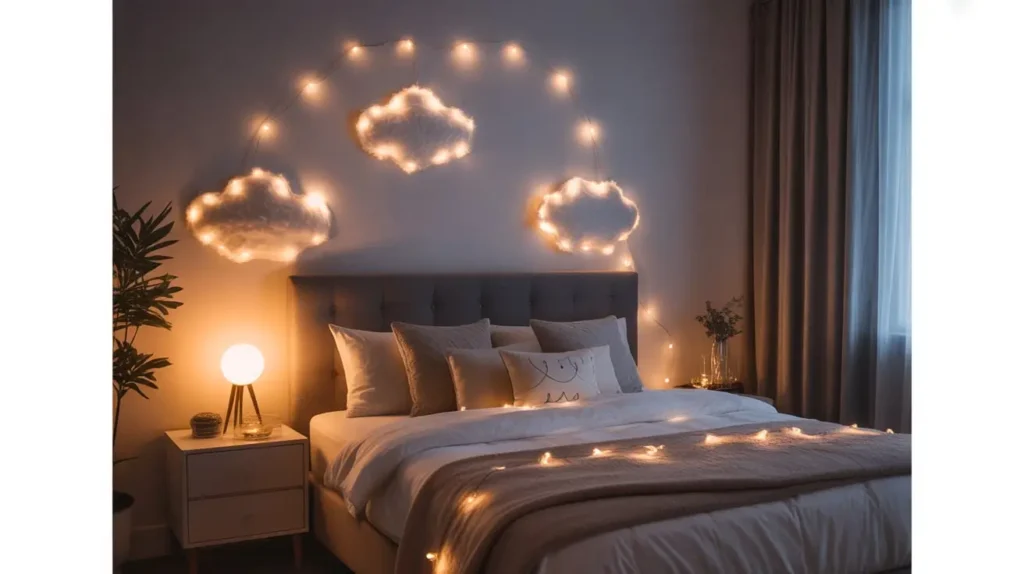
Okay, this one’s adorable and perfect if you want something a little whimsical without going full-on kid’s room. Moon and cloud fairy lights bring this dreamy, celestial vibe that works for literally any age.
You can buy moon-shaped fairy lights (they’re shaped like little crescents) or cloud lights specifically, but I also just made my own using cotton batting and regular fairy lights. I shaped clouds from the cotton, tucked lights inside, and hung them from my ceiling with clear fishing line. The result? Fluffy, glowing clouds floating above my bed.
For the moon element, I got a larger LED moon lamp for my nightstand and surrounded it with star-shaped fairy lights on the wall. The combination of the big moon and tiny stars creates this celestial scene that’s honestly too pretty.
DIY cloud lights tutorial:
- Pull apart cotton batting or polyfill
- Loosely wrap it around clusters of fairy lights
- Shape into cloud forms (don’t pack too tight)
- Hang with fishing line or thin wire
- Enjoy your indoor sky
This theme works especially well if you’re going for that cottagecore or celestial aesthetic. It’s soft, dreamy, and photographs beautifully (not that we’re decorating for the ‘gram, but… you know).
12. Color-Changing Mood Lighting Bedroom
Sometimes you want options, you know? Some nights call for relaxing blue tones, others need energizing pink, and sometimes you just want to cycle through the rainbow because why not?
Color-changing fairy lights give you flexibility that regular warm white just can’t match. I have a set that comes with a remote (crucial for lazy bedtime adjustments), and I can control both the color and the pattern. Steady glow? Sure. Gentle fade? Absolutely. Twinkling rainbow? When the mood strikes.
Here’s what I use different colors for:
- Blue/Purple: Late evening relaxation, pre-sleep wind-down
- Warm white/Yellow: Reading, getting ready, general evening activities
- Pink/Red: Honestly just looks cool and cozy
- Green: Weirdly calming? I use this when I’m stressed
- Rainbow mode: Cleaning my room (makes chores less boring)
The remote control aspect is clutch. I can change my entire room’s vibe without getting out of bed. Lazy? Maybe. Genius? Definitely.
One word of caution though—avoid the harsh, bright color modes right before bed. Your circadian rhythm will hate you. Stick to warmer tones or dim blues as you get closer to sleep time. Save the disco lights for daytime :/
13. Vintage Fairy Light Wall Display
If you love that vintage, nostalgic vibe, this setup will speak to your soul. I created a vintage-inspired wall display using Edison bulb-style fairy lights—you know, those ones that look like old-fashioned light bulbs but in miniature.
The warm, amber glow they emit is completely different from regular fairy lights. It’s more golden, more nostalgic, and pairs incredibly well with vintage decor elements like old frames, antique mirrors, or retro posters.
I hung mine in a deliberate but casual pattern across my wall, creating almost a grid effect but not too perfect. Then I added vintage frames, old postcards, and some dried flowers to complete the look. The lights make everything look like it’s been kissed by golden hour, all day and night.
Vintage styling elements that pair well with Edison fairy lights:
- Sepia-toned or black-and-white photos
- Antique frames (thrift stores are gold mines)
- Dried flowers, especially in muted colors
- Old books or vintage cameras as props
- Copper or brass accents
This aesthetic works especially well if you’re into that grandmillennial or vintage maximalist style. It’s got history, warmth, and character—all amplified by the right lighting.
14. Indoor Plant + Fairy Light Styling
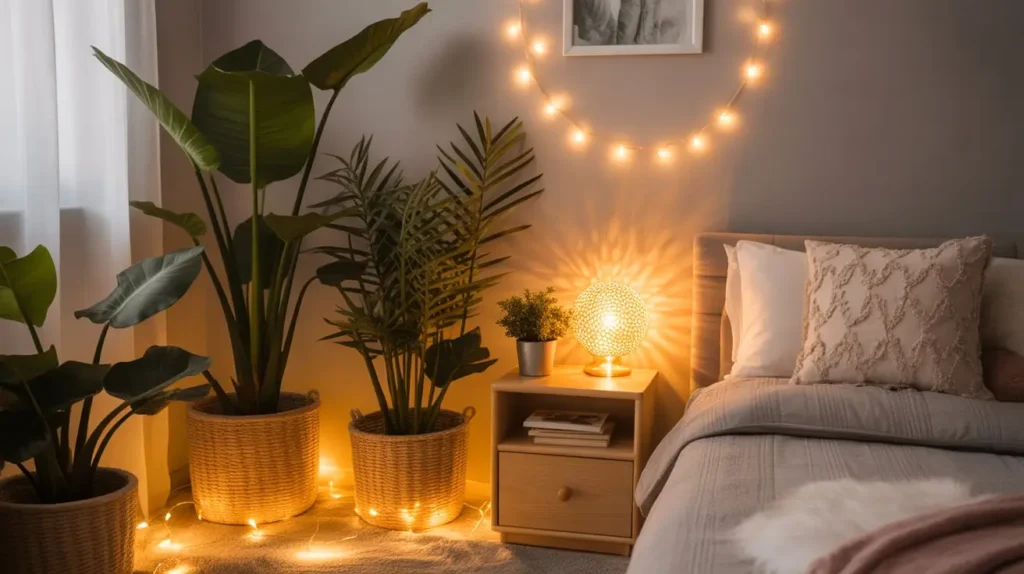
Plants and fairy lights together? Absolute perfection. If you’re a plant parent (or wannabe plant parent with mostly succulents like me), adding fairy lights to your plant setup elevates everything.
I weave thin copper wire fairy lights through my hanging pothos, wrap them around my snake plant’s pot, and tuck them into my shelf of succulents. When the lights are on, your plants become living art installations.
The trick is keeping the lights subtle enough that they enhance the plants without overwhelming them. You want people to notice your gorgeous monstera first, then realize “oh wow, it’s also lit up beautifully.”
Here’s how I style different plant types:
- Hanging plants: Weave lights through trailing vines
- Large floor plants: Wrap lights around the base or pot
- Shelf plants: Tuck lights behind or between pots
- Window plants: String lights across the window frame
The combination of organic plant shapes and twinkling lights creates this indoor garden vibe that’s incredibly calming. Plus, the warm light actually makes your plants look healthier and more vibrant (even if you forgot to water them last week—not that I’d know anything about that).
Battery-operated fairy lights work best for this unless you want cords running everywhere. Trust me, I learned that lesson the hard way.
15. Personalized Name or Quote Light Decor
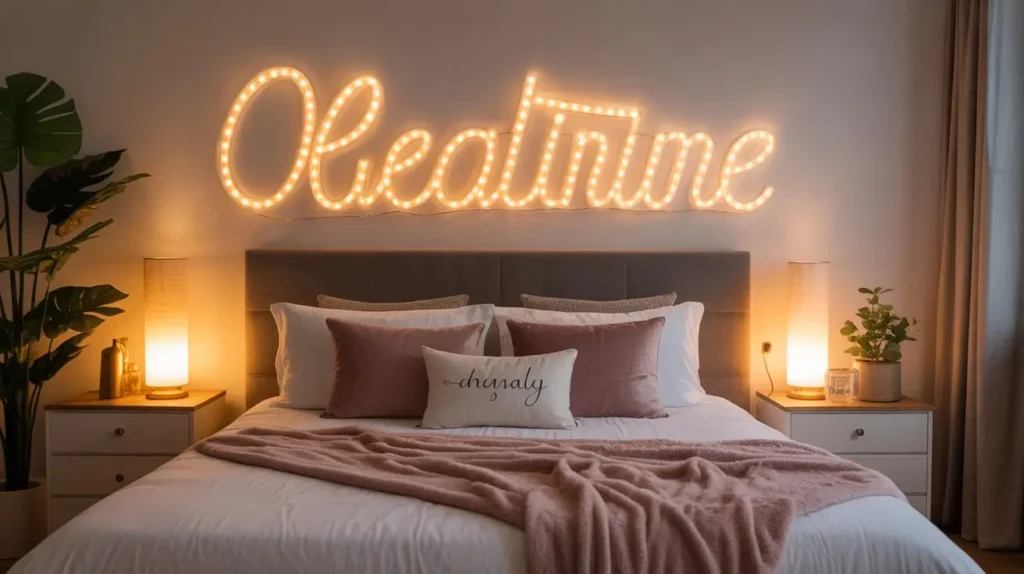
Last but definitely not least, let’s talk about personalized light decor. This is where you can really make your space uniquely yours.
You can buy neon-style LED signs with your name, initials, or favorite quotes, but you can also DIY this with wire and fairy lights. I made my own using wire to form cursive letters, then wrapped fairy lights around the wire frame. It’s hanging above my bed, and I get compliments on it constantly.
For the less crafty (totally valid), there are tons of customizable options online where you can order your specific text. Popular choices include:
- Your name or initials
- Motivational quotes (“Good vibes only,” “Dream big,” etc.)
- Song lyrics that mean something to you
- Inside jokes or meaningful phrases
- Zodiac signs or symbols
I went with a simple “breathe” in cursive because I needed the reminder, and having it literally glowing in my room helps me remember to actually, you know, breathe when life gets chaotic.
Placement ideas for personalized light decor:
- Above your headboard as a focal point
- On a prominent wall opposite your bed
- Above your desk or vanity
- Near your door as a welcome/goodbye reminder
This type of decor adds serious personality to your space. It’s not just pretty lights—it’s your pretty lights with meaning attached. That makes all the difference.
Wrapping It All Up
So there you have it—15 ways to transform your bedroom into a cozy, aesthetic haven using fairy lights. The best part? You don’t need a huge budget or professional design skills. Just some creativity, a few strings of lights, and the willingness to experiment.
I’ve tried all of these setups (my bedroom has been through more phases than a Marvel movie franchise), and honestly, mixing and matching is where the real magic happens. Take the starry ceiling from tip one, add some plants with lights from tip fourteen, throw in a personalized sign, and suddenly you’ve created something completely unique to you.
Start with one or two ideas that really speak to you, see how they feel in your space, then build from there. Your bedroom should make you happy every single time you walk in. If fairy lights help achieve that? String ’em up without shame.
Now if you’ll excuse me, I need to go adjust my fairy lights for the fifteenth time today because I just thought of another configuration to try. The struggle is real, but at least it’s a cozy struggle.