10 Stunning Large Wall Decor Living Room Ideas to Try Today
You know that enormous wall in your living room that’s been staring at you for months? The one that makes your furniture look like dollhouse pieces and your regular artwork look like postage stamps? Yeah, I’ve been there. I once hung a standard 16×20 print on my 15-foot wall, and my friend asked if I was “still decorating” six months later. Brutal, but fair.
Here’s the thing about large living room walls – they’re not problems, they’re opportunities. You just need to think bigger, bolder, and sometimes completely differently than you would with normal-sized walls. After spending three years figuring out what actually works on massive walls (and what looks ridiculous), I’m here to save you from my mistakes.
Whether you’re dealing with vaulted ceilings, open floor plans, or just an inexplicably huge wall that the architect thought was a good idea, I’ve got solutions that actually make sense. And no, you don’t need to sell a kidney to afford them all.
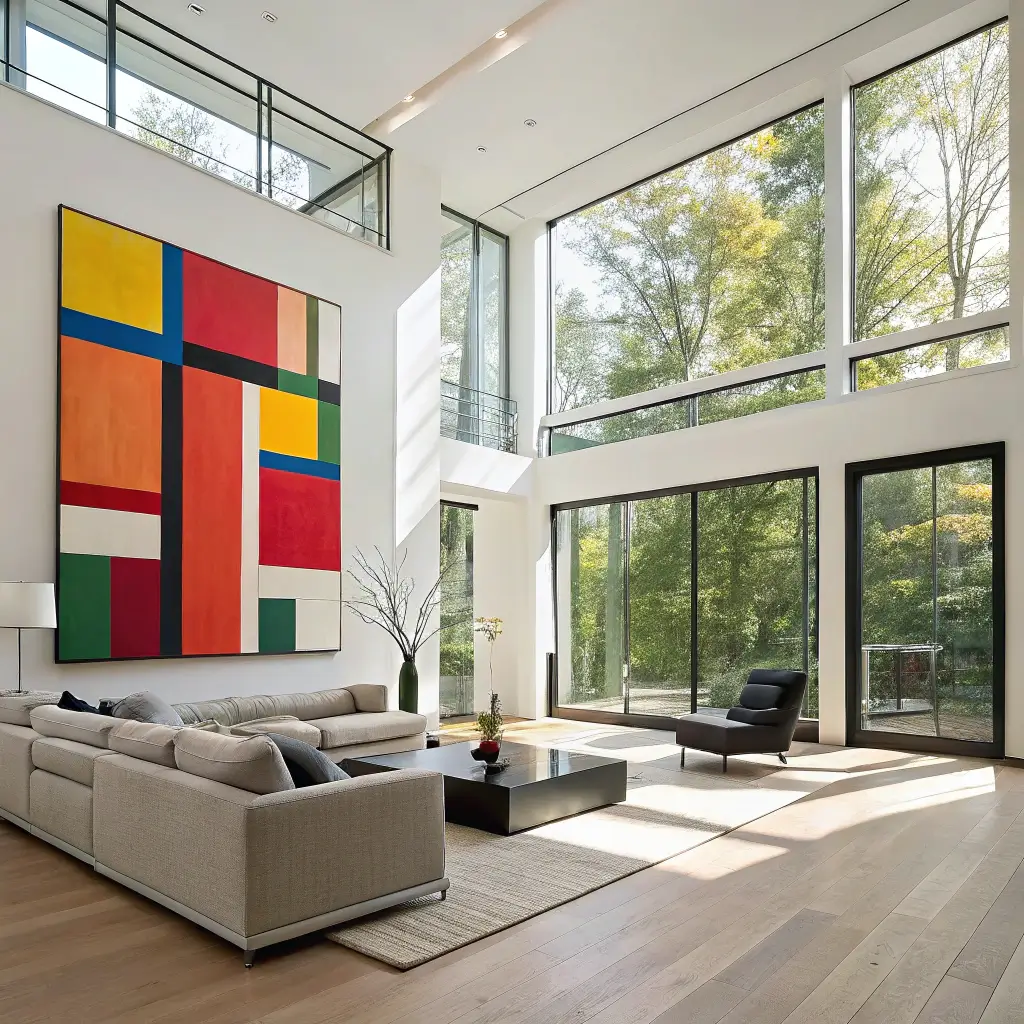
Oversized Abstract Canvas Art
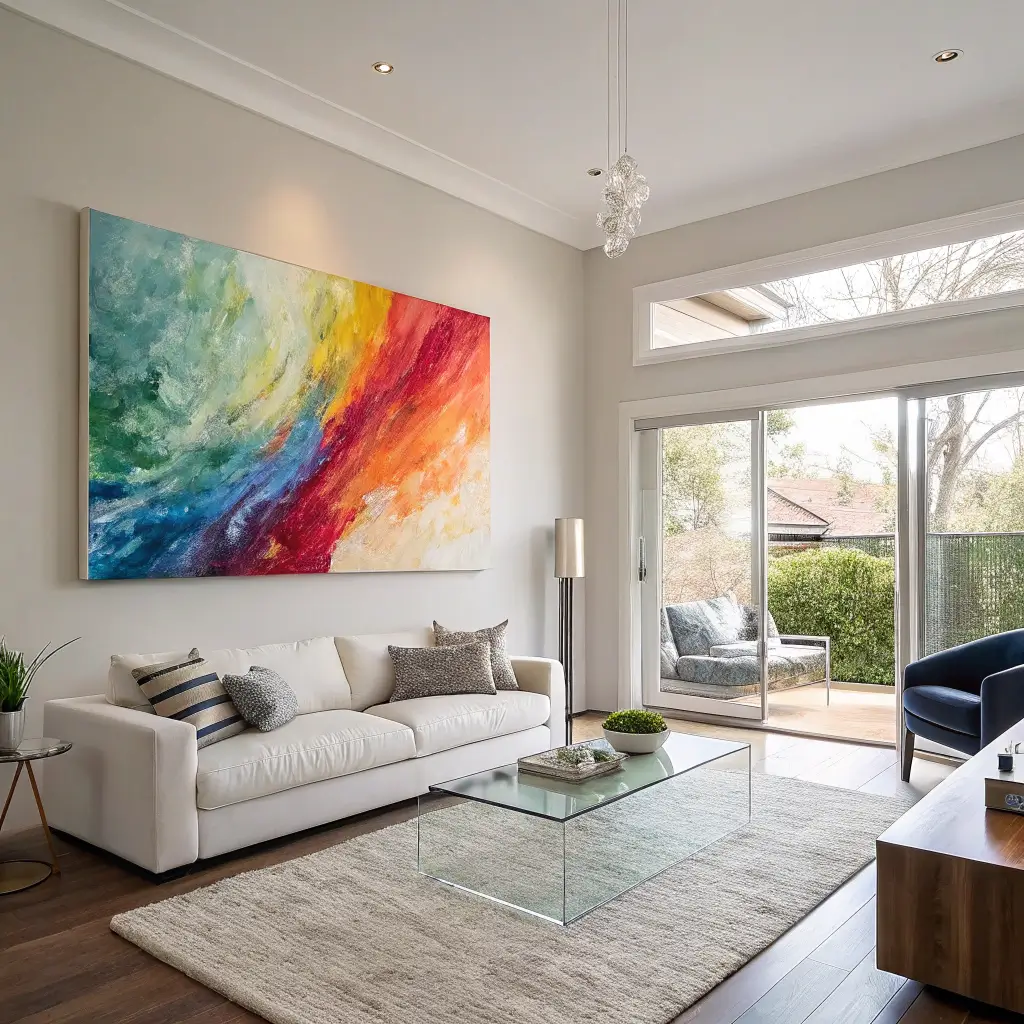
Why Size Actually Matters Here
Let me tell you about the time I thought a 24×36 canvas would look “substantial” on my living room wall. It looked like a napkin taped to the Great Wall of China. Oversized abstract art needs to be genuinely oversized – we’re talking minimum 48 inches on the longest side, but honestly, bigger is almost always better.
I finally invested in a 60×80 inch abstract piece, and the transformation was instant. The room suddenly had a focal point, conversations had a natural starting point, and my living room stopped feeling like an empty warehouse. Abstract works particularly well because it doesn’t need to be “readable” from across the room – it’s about color, movement, and presence.
The beauty of abstract art at this scale? It doesn’t compete with your furniture or decor. It complements everything while demanding its own respect. Plus, nobody can tell you it’s hung wrong because there’s no real “right side up.”
Finding Affordable Large-Scale Art
Real talk: massive original paintings cost more than my car. But you’ve got options that don’t require taking out a second mortgage. Canvas prints have come so far that even art snobs can barely tell the difference from across a room.
Here’s how I built my collection without bankruptcy:
- Digital prints on canvas: Found amazing artists on Etsy selling high-res files for $30
- DIY abstract paintings: Seriously, anyone can throw paint at a huge canvas
- Photography blown up: Your own photos printed massive look incredible
- Commissioned pieces from art students: Talented, hungry, and affordable
- Estate sales and auctions: Rich people downsize, you benefit
My current favorite piece? A massive abstract I painted myself after three glasses of wine and a YouTube tutorial. Cost me $60 in supplies, and everyone thinks it’s from a gallery.
Hanging Heavy Art Without Drama
Nobody tells you that hanging a 60-pound canvas is basically an extreme sport. I learned this after my first attempt resulted in a 2 AM crash that sounded like the house was collapsing. Proper mounting is everything with oversized pieces.
Essential hanging tips:
- Find studs or use heavy-duty wall anchors (100+ pound capacity)
- Use two or more hanging points to distribute weight
- French cleats are your best friend for super heavy pieces
- Measure seventeen times, drill once
- Get help (seriously, don’t be a hero)
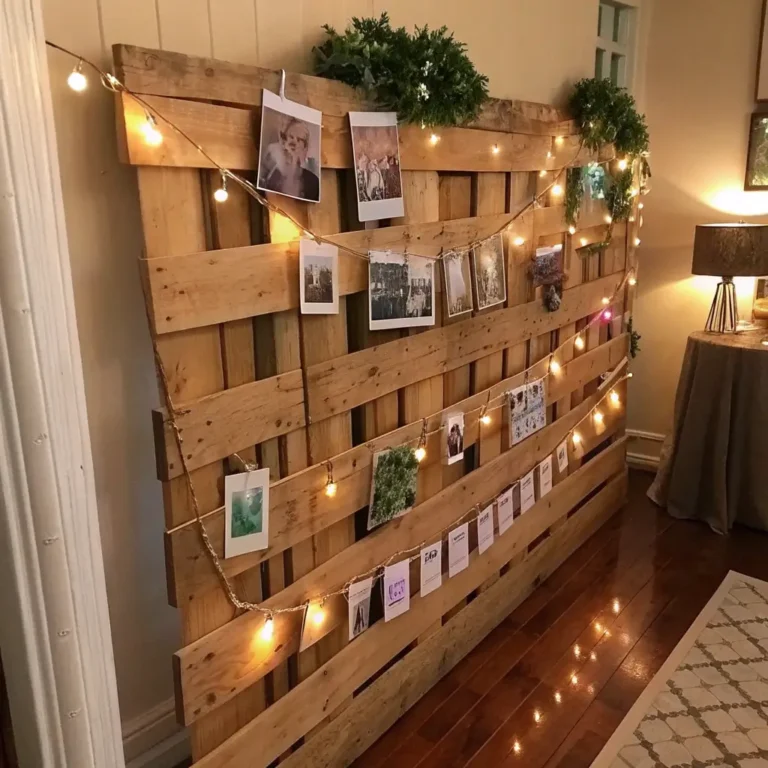
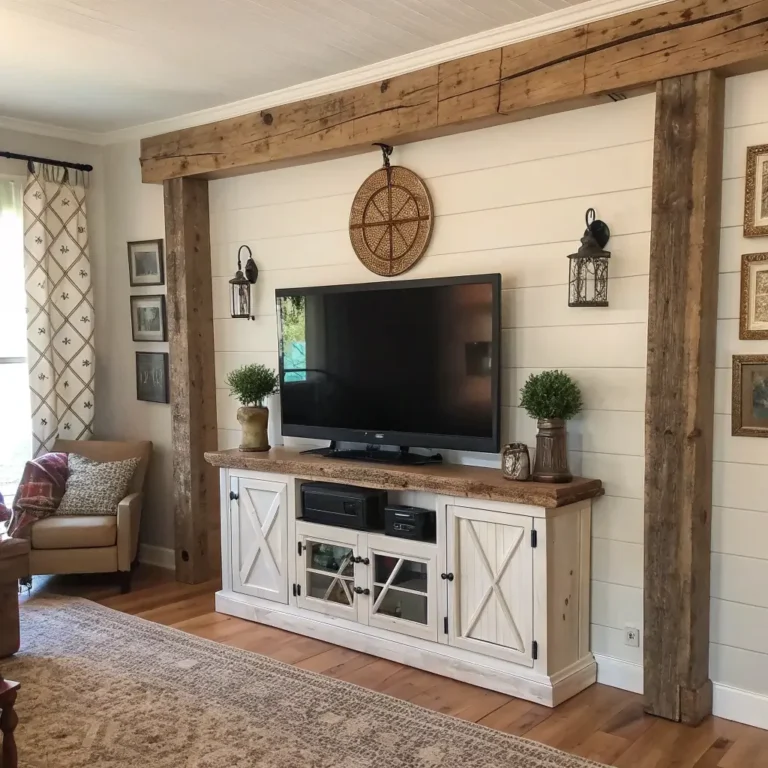
Large Rustic Wooden Wall Panels
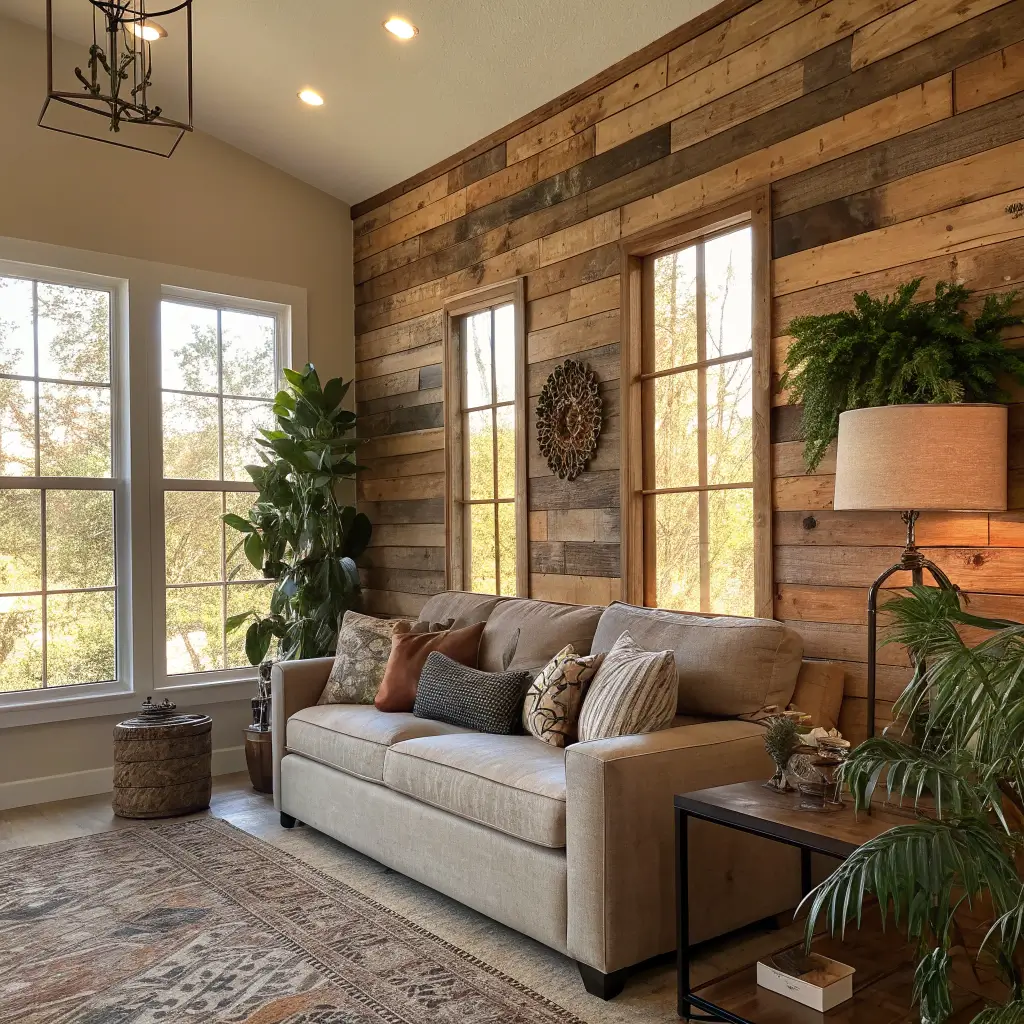
The Warmth Factor You Can’t Fake
Wooden wall panels changed my living room from “nice” to “Is this in a magazine?” The texture, warmth, and dimension they add can’t be replicated with paint or wallpaper. Real wood brings soul to a space in a way that nothing else quite manages.
I started with reclaimed barn wood panels covering just one accent wall. The installation took a weekend, cost less than $400, and completely transformed the entire vibe. The room went from sterile modern to cozy-but-sophisticated overnight.
The best part? Every panel tells a story. Mine have nail holes, saw marks, and weathering that took decades to develop naturally. You literally can’t buy that character new.
DIY vs. Pre-Made Panel Systems
You’ve got two routes here: source and install individual boards yourself, or buy pre-made panel systems. I’ve done both, and honestly? Pre-made isn’t always the cop-out it seems.
DIY approach benefits:
- Total creative control
- Significantly cheaper
- Satisfaction of building it yourself
- Customize to exact wall dimensions
Pre-made system benefits:
- Consistent quality and finish
- Faster installation
- Often includes mounting systems
- No splinters or surprise rot
I recommend DIY if you’re handy and have time. But if the thought of measuring and cutting 50 boards makes you want to cry, pre-made systems are worth every penny.
Creating Patterns That Pop
Straight horizontal planks are fine, but why stop there? I’ve seen herringbone patterns that make people stop mid-sentence, chevron designs that create optical illusions, and mixed-width installations that look like modern art.
My living room features a subtle chevron pattern that took forever to install but gets compliments literally every time someone new visits. The angle adds movement without being overwhelming.
Pattern ideas that kill:
- Herringbone: Classic, sophisticated, always works
- Random width horizontal: Modern farmhouse vibes
- Vertical installation: Makes ceilings look higher
- Geometric shapes: Diamond or hexagon patterns for the brave
- Mixed direction: Combining horizontal and vertical for zones
Giant Metal Sculptures

Making a Statement Without Words
Metal wall sculptures do something paintings can’t – they create shadows, reflect light, and change appearance throughout the day. My 6-foot metal tree sculpture looks completely different at noon versus sunset, keeping the room dynamic.
The dimensionality breaks up flat walls in ways that make designers weep with joy. I hung mine slightly away from the wall, creating shadows that basically double as free artwork. Two for one deal!
Finding Pieces That Don’t Break the Bank
Original metal artwork costs insane amounts, but the alternatives are surprisingly good. I’ve collected five large pieces over two years without spending more than $300 each.
Budget-friendly sources:
- Home goods stores (seriously, they’ve upped their game)
- Online marketplaces from international artists
- Local craft fairs (support artists, get deals)
- Wholesale decor sites (same stuff, half the price)
- DIY with wire and spray paint (easier than you think)
Installation Without Destroying Your Wall
Metal art is heavy and often oddly shaped, making installation tricky. My first attempt left three unnecessary holes because I didn’t account for the weight distribution. Learn from my mistakes – measure everything twice and use appropriate hardware.
Must-know installation tips:
- Use a level and template before drilling anything
- Toggle bolts for drywall, screws for studs
- Consider the piece’s center of gravity
- Leave space between wall and sculpture for shadows
- Photograph the wall before hanging (for deposit purposes)
Also Read: 10 Unique Album Cover Wall Decor Styles for Your Home
Statement Tapestry Wall Hangings
Textile Art That Actually Works
Tapestries got a bad reputation from dorm rooms, but large-scale textile art is having a serious moment. Modern tapestries are sophisticated, adding softness and warmth that hard surfaces can’t match.
My living room tapestry is 8×10 feet of hand-woven gorgeousness that also happens to improve the room’s acoustics. Win-win. It softens echoes and makes conversations feel more intimate.
Choosing Patterns and Textures
The key to adult tapestries is choosing sophisticated patterns and quality materials. Skip the mandala prints and go for abstract geometrics, landscapes, or modern interpretations of traditional designs.
What works in living rooms:
- Neutral color palettes with texture variation
- Large-scale patterns that read from distance
- Natural fibers that age beautifully
- Original artwork reproduced on fabric
- Vintage kilims or suzanis for authentic character
Hanging Methods That Don’t Sag
Nothing ruins a tapestry faster than sagging corners and wrinkled centers. I tried push pins once. Once. Proper mounting makes tapestries look like intentional art, not afterthoughts.
Professional hanging methods:
- Wooden dowel rod through top pocket
- Velcro strips for even weight distribution
- Decorative curtain rod for easy removal
- Frame with wood strips for museum look
- Invisible mounting system behind fabric
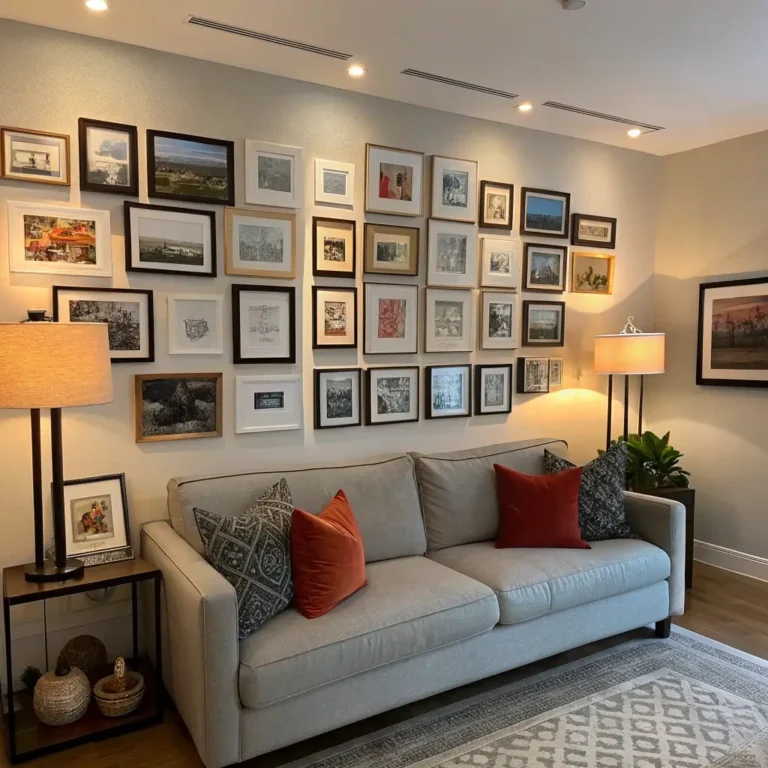
Multi-Frame Gallery Wall
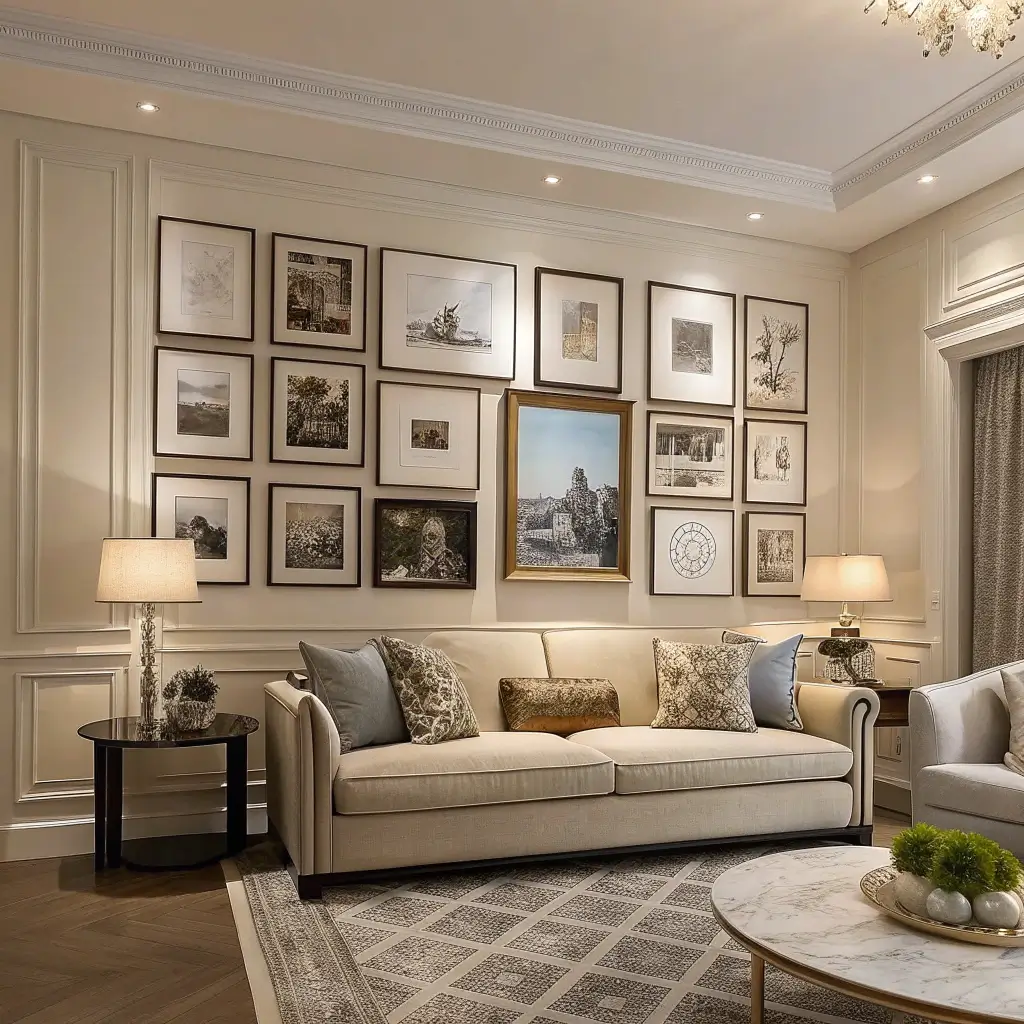
The Art of Controlled Chaos
Gallery walls on massive walls need serious planning. You can’t just hang 10 frames and call it done – you need 30, 40, maybe 50 pieces to fill the space properly. Think of it as curating a personal museum.
My living room gallery has 47 frames ranging from 4×6 to 24×36. It took three months to collect everything and one very long weekend to hang, but it’s the best thing I’ve ever done to a wall.
Creating Cohesion in Variety
The trick to large gallery walls is finding the thread that ties everything together. Without some unifying element, you’ve just got chaos. Pick one consistent factor and let everything else vary.
Unifying elements that work:
- Frame color (all black, all gold, all wood)
- Mat color (white mats make everything cohesive)
- Subject matter (all landscapes, all portraits)
- Color palette (limit to 3-4 colors)
- Style (all photography, all illustrations)
I chose black frames with white mats, then went wild with the actual art. The consistency makes even my kid’s crayon drawing look gallery-worthy.
The Template Method That Saves Sanity
Do not, I repeat, DO NOT start hammering nails randomly. I tried the “eyeball it” method and ended up with 73 holes in my wall. Paper templates will save your wall and your sanity.
My foolproof process:
- Cut paper to match every frame size
- Arrange on floor first
- Transfer to wall with painter’s tape
- Live with it for 24 hours
- Adjust until it’s perfect
- Mark nail holes through paper
- Remove paper and hang frames
FYI, this method has saved three friendships and one marriage (mine).
Floor-to-Ceiling Wall Decals
Decals That Don’t Look Cheap
Modern wall decals have graduated from butterflies and inspirational quotes. We’re talking architectural elements, massive nature scenes, and geometric patterns that transform entire walls. Quality decals look painted on when applied correctly.
I installed a floor-to-ceiling birch forest decal that everyone assumes is hand-painted. It cost $200 and took three hours to install. A mural artist quoted me $3,000 for the same effect.
Application Without Bubbles or Tears
The secret to professional-looking decals is patience and the right tools. You cannot rush this process. I tried to speed through my first decal and ended up with more bubbles than a champagne factory.
Application essentials:
- Clean the wall obsessively first
- Use a squeegee (credit cards work in a pinch)
- Work from center outward always
- Apply in sections for huge decals
- Hair dryer for curved surfaces or corners
Choosing Designs That Age Well
Trendy decals are tempting, but think long-term. That geometric mountain range might be everywhere on Instagram now, but will you love it in two years? Choose designs with staying power.
Timeless decal themes:
- Nature scenes (trees, mountains, clouds)
- Architectural elements (arches, columns)
- Abstract patterns
- City skylines
- Constellation maps
Also Read: 10 Beautiful Hallway Wall Decor Ideas for a Cozy Vibe
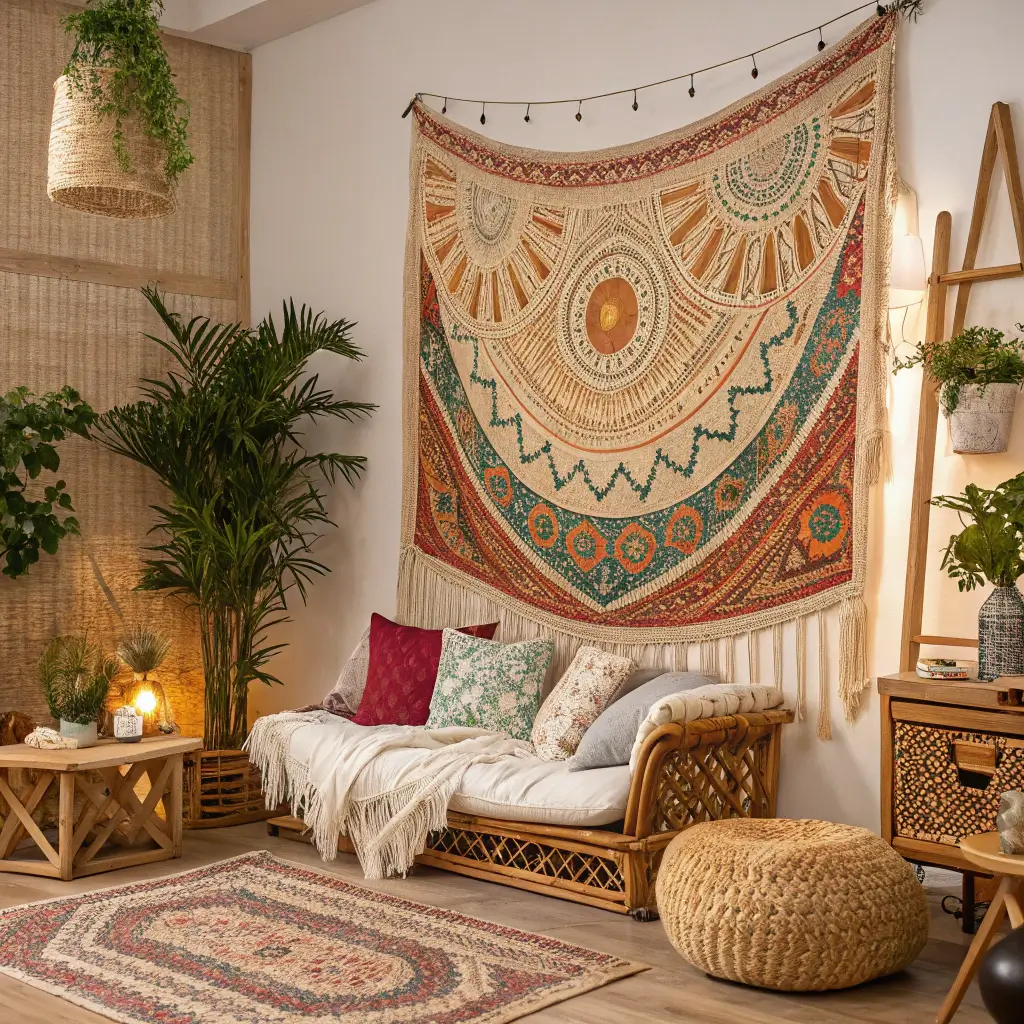
Large Macramé Wall Art
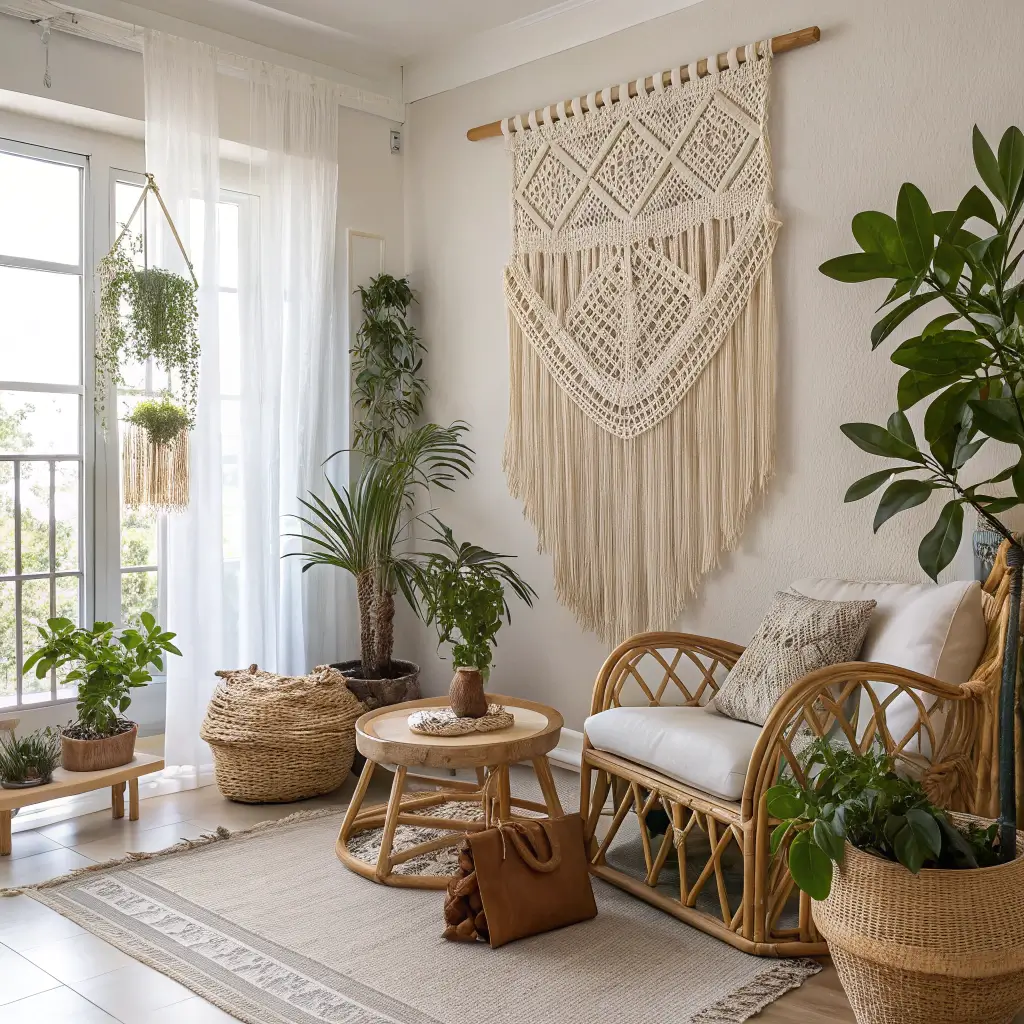
Texture That Commands Attention
Macramé isn’t just for plant hangers anymore. Large-scale macramé pieces add incredible texture and warmth to living rooms. My 5×7 foot macramé hanging is basically functional art – it’s beautiful and dampens sound from the street.
The knots and patterns create shadows that shift with lighting, making the wall dynamic throughout the day. Plus, it’s one of the few art forms that you’re encouraged to touch.
Finding Quality Pieces That Last
Mass-produced macramé often looks thin and sad. You want substantial rope, tight knots, and intricate patterns. Quality pieces feel heavy and look complex up close.
What to look for:
- Natural fibers (cotton or jute)
- Minimum 5mm rope thickness
- Complex patterns beyond basic knots
- Sturdy hanging system
- Finished edges that won’t fray
I bought one cheap piece that basically disintegrated after six months. Now I only buy from actual fiber artists, and the difference is astronomical.
Styling Around Soft Art
Macramé needs breathing room to shine. Don’t crowd it with other wall decor or furniture. Let it be the soft focal point against harder elements in your room.
Styling tips that work:
- Mount at eye level or slightly higher
- Keep furniture 12+ inches away
- Pair with plants for boho vibes
- Add subtle lighting from below
- Choose neutral colors for versatility
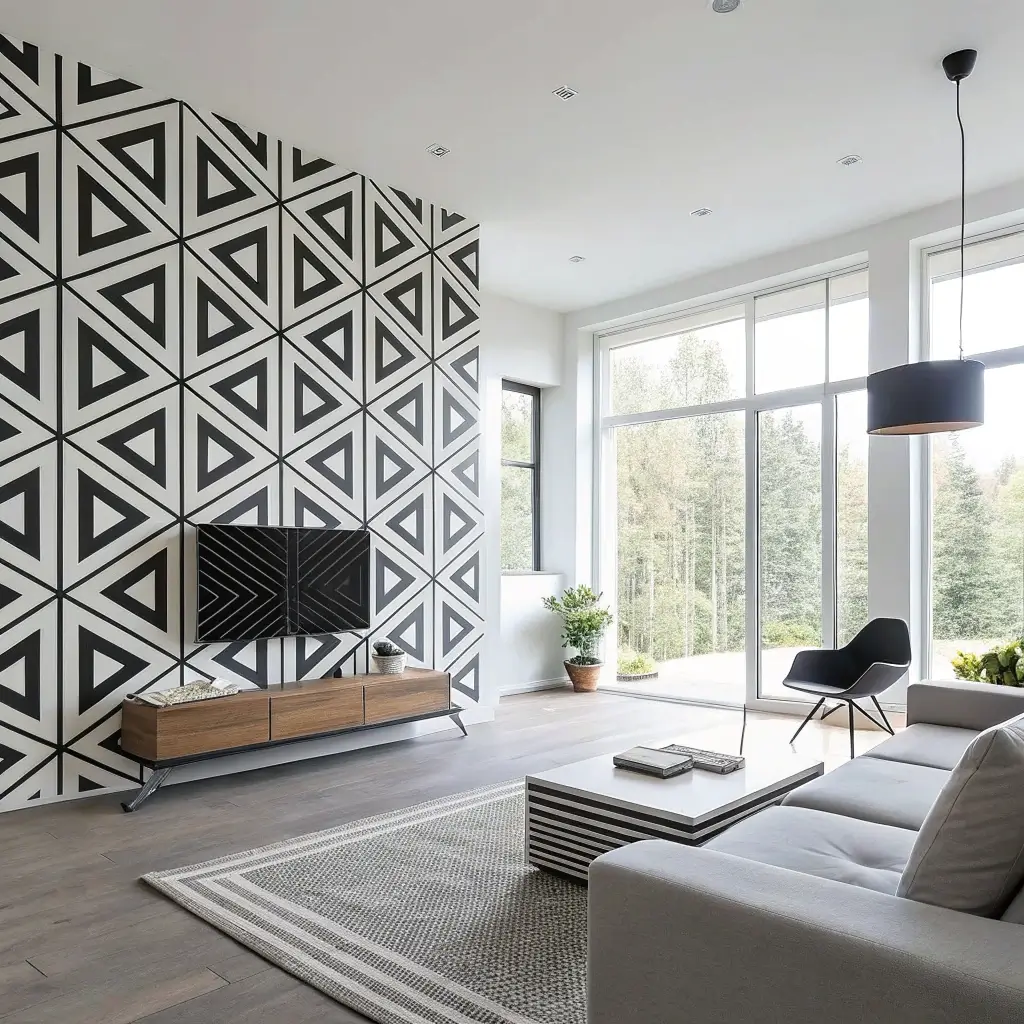
Bold Geometric Paintings
Making Math Look Sexy
Geometric art at scale turns walls into statements. The clean lines and bold shapes work in any style room – modern, traditional, even farmhouse if you choose right. Large geometric pieces feel intentional and sophisticated.
My 72-inch hexagon painting gets more comments than anything else I own. People either love it or hate it, but nobody ignores it. That’s exactly what large wall art should do.
Color Combinations That Pop
The beauty of geometric art is you can be bold with color without it feeling chaotic. The structure of shapes contains the energy. I went with navy, gold, and white – safe but striking.
Winning color combos:
- Black, white, and one bold color
- Gradient within the same color family
- Complementary colors (blue/orange, purple/yellow)
- Monochromatic with texture variation
- Metallic accents against matte backgrounds
DIY Geometric Art That Looks Pro
You can absolutely create your own geometric art. Painter’s tape and patience are all you need. My first DIY geometric painting took six hours but saved me $800.
DIY process that works:
- Prime your canvas white
- Sketch design lightly in pencil
- Apply tape for clean lines
- Paint one color at a time
- Remove tape while paint is slightly wet
- Touch up any bleeds
- Seal with clear coat
The key is taking your time with the tape. Rushed tape equals bleeding paint equals starting over.
Oversized Nature Photography Prints
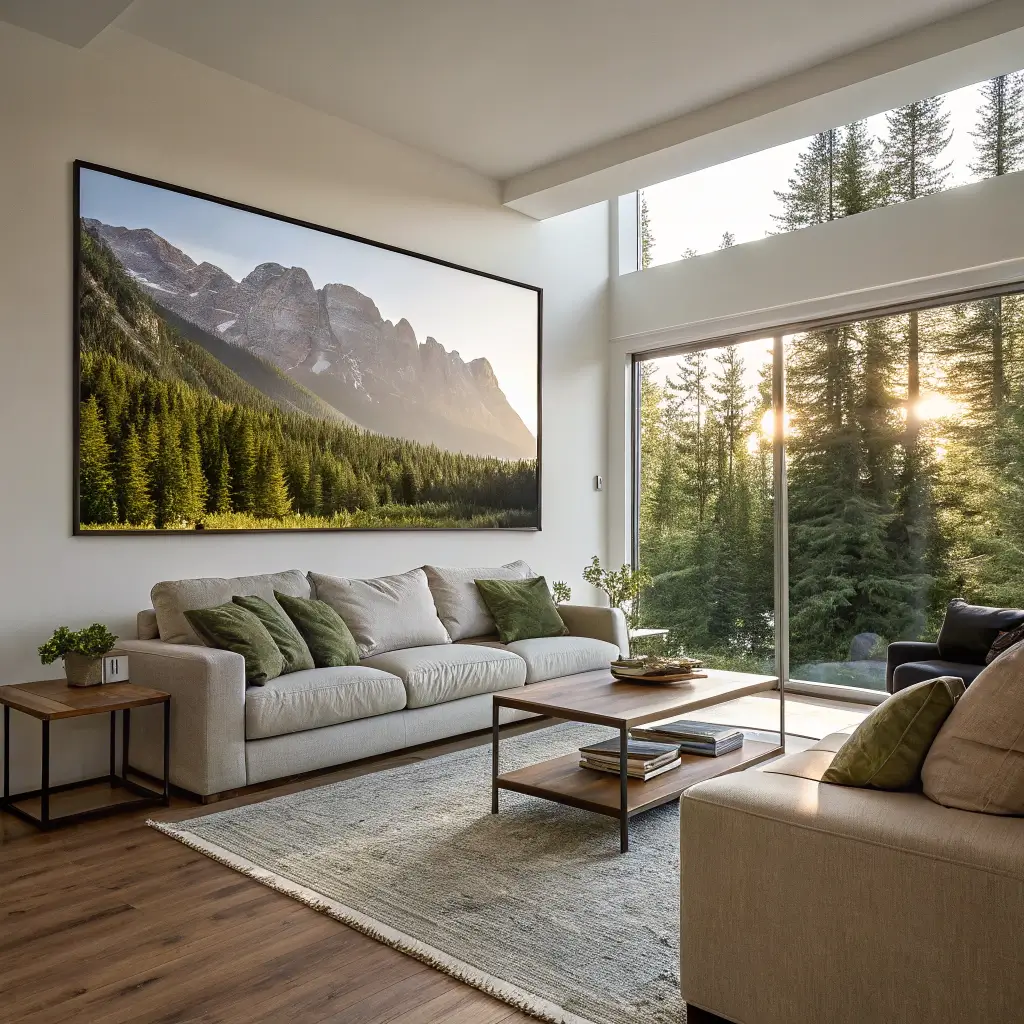
Bringing the Outside In
Nothing opens up a room like a massive nature photograph. Mountains, oceans, forests – at 60+ inches, these prints create windows where walls exist. My living room forest print literally makes people take deeper breaths.
The psychological effect is real. Large nature photography makes rooms feel bigger, calmer, and more connected to the outside world. Essential for apartment dwellers or anyone in concrete jungles.
Finding High-Resolution Images
The bigger you print, the better your image quality needs to be. Pixelated mountains aren’t majestic; they’re depressing. You need seriously high-resolution files for large prints.
Where to find print-worthy images:
- Professional photography sites (expensive but worth it)
- Your own photos (if shot in RAW)
- Stock photo sites with commercial licenses
- Local photographers looking for exposure
- National park services (often free!)
Printing and Mounting Options
Canvas is popular, but consider alternatives for nature photography. Metal prints make landscapes look insanely vivid, while acrylic adds depth that canvas can’t match.
Print surface comparison:
- Canvas: Textured, warm, forgiving of lower resolution
- Metal: Vivid colors, modern, expensive
- Acrylic: Glossy, depth, shows every detail
- Paper under glass: Classic, needs great framing
- Wood prints: Rustic, unique grain patterns
I have three different print types in my living room. The variety adds interest while the subject matter (all forests) keeps things cohesive.
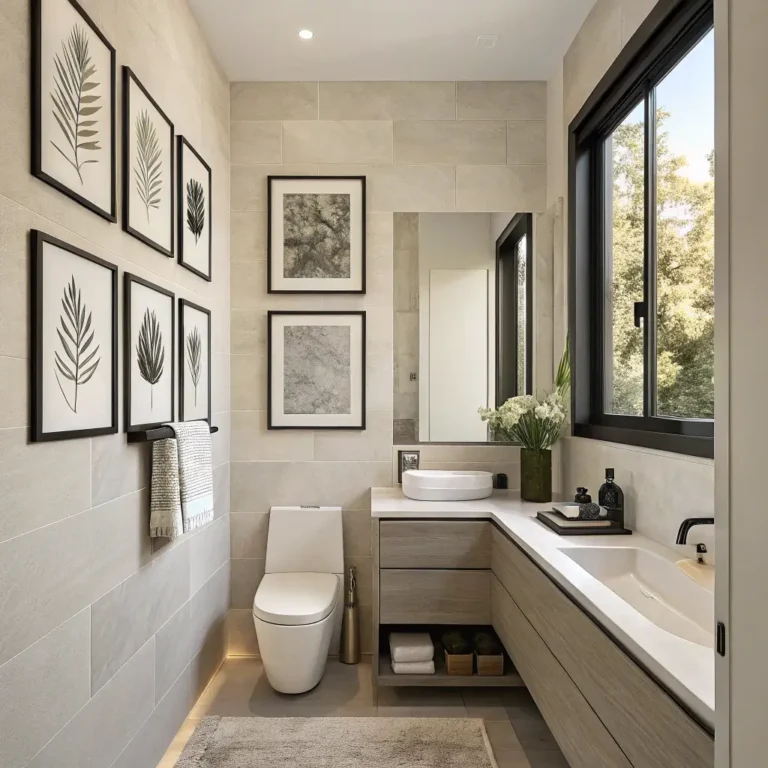
Also Read: 10 Chic Bathroom Wall Decor Ideas to Elevate Your Style
Custom 3D Wall Panels
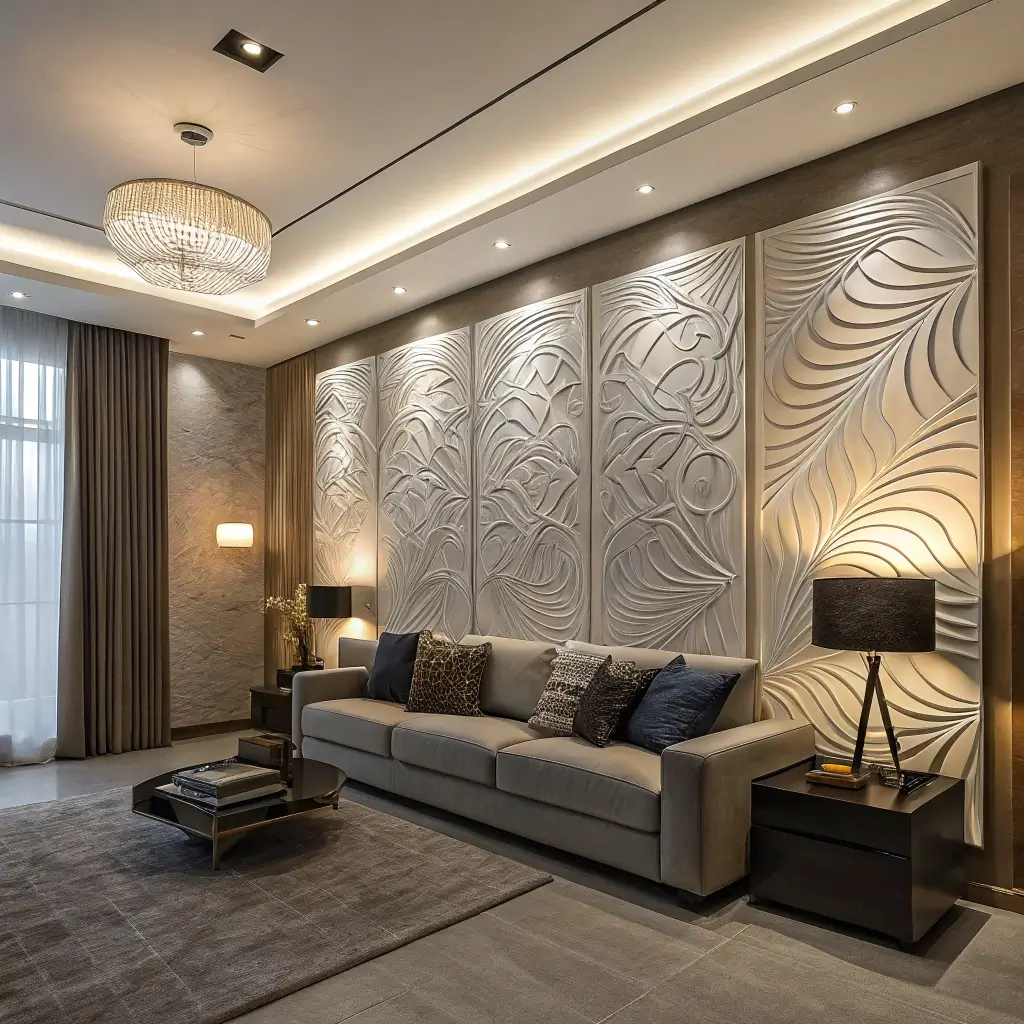
Dimension That Changes Everything
3D panels transform flat walls into architectural features. We’re not talking about that foam brick nonsense – real dimensional panels that create shadows and movement. My living room panels make a basic drywall look like it belongs in a boutique hotel.
The patterns range from subtle waves to dramatic geometric protrusions. Light plays across them differently throughout the day, creating an ever-changing canvas that paint could never achieve.
Material Options and Costs
3D panels come in everything from PVC to real wood veneer. Your choice depends on budget, style, and how permanent you want the installation to be.
Material breakdown:
- PVC panels: Affordable, lightweight, paintable ($30-50/panel)
- MDF: Heavier, more substantial, takes paint well ($40-70/panel)
- Gypsum: Fire-resistant, soundproofing qualities ($50-100/panel)
- Wood veneer: Gorgeous, expensive, permanent ($100-200/panel)
- Felt or fabric: Soft, sound-absorbing, modern ($80-150/panel)
I went with paintable MDF for the main wall and felt panels for the TV wall. The combination looks intentional and serves different purposes.
Installation Reality Check
Installing 3D panels is commitment. This isn’t weekend warrior territory unless you’re actually handy. I hired professionals for the main installation but did touch-ups myself.
What you’re really signing up for:
- Precise measuring and cutting
- Dealing with outlets and switches
- Perfect alignment or it looks terrible
- Potential wall damage if removed
- 2-3 day installation minimum
That said, the impact is unmatched. My panels have been up for two years, and I still catch myself staring at them :/
Making the Big Decision
Here’s what nobody tells you about large wall decor: you won’t nail it on the first try. I’ve rehung, repainted, and replaced pieces multiple times before finding what works. That’s not failure; it’s refinement.
Start with one bold move. Pick the solution that made you excited while reading about it. Your living room wall is begging for personality, and any of these options beats staring at beige paint for another year.
The beauty of large-scale decor is that when you get it right, it doesn’t just fill space – it transforms the entire room’s energy. My living room went from a place to watch TV to a space people actually compliment. That massive wall you’ve been avoiding? It’s about to become your favorite feature.
Take the plunge. Your living room wall has been patient long enough, and IMO, life’s too short for boring walls. Whether you go with a giant canvas, custom panels, or that gallery wall you’ve been planning forever, just remember: bigger really is better when it comes to large wall decor.
Now stop reading and start measuring. That wall isn’t going to decorate itself 😉