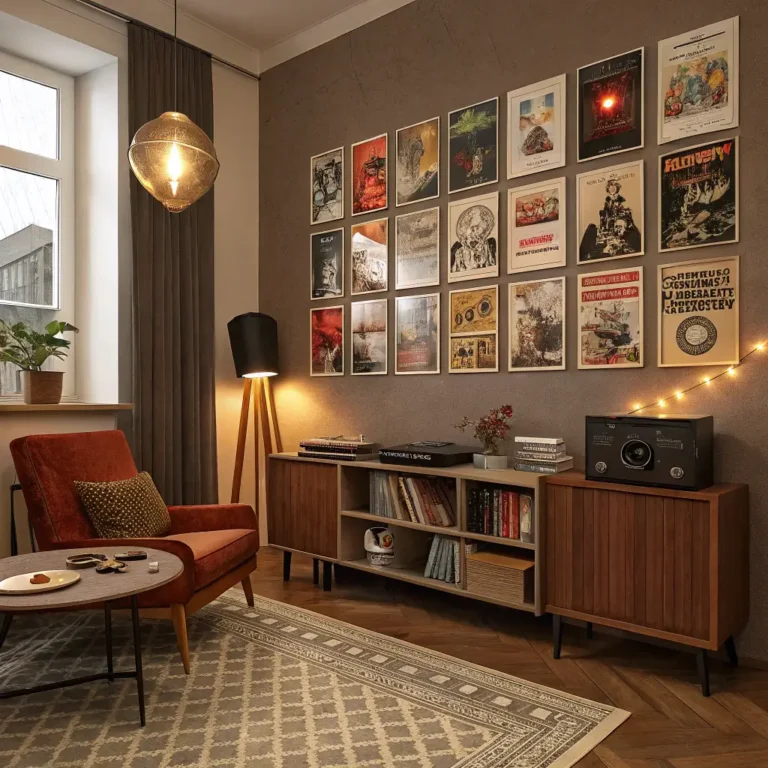
10 Simple Small Wall Decor Ideas with Big Impact
Look, I get it. You’re staring at that awkward blank wall space—you know, the one that’s too small for a massive gallery wall but too visible to ignore completely. Maybe it’s that sliver of wall between your doorframe and corner, or that narrow strip in your hallway that makes you wonder what the architect was thinking. Whatever it is, I’ve been there, and I’ve got your back.
Here’s the thing: small wall spaces are actually blessing in disguise. They’re like the appetizer of interior design—easy to experiment with, budget-friendly, and you can totally switch them up without committing to a full-blown room makeover. After years of renting apartments with weird layouts and homeowning adventures that taught me patience (and spackling skills), I’ve collected some seriously cool ideas that punch way above their weight class.
So grab your coffee, get comfy, and let’s talk about ten small wall decor ideas that’ll make your friends ask, “Wait, where’d you get that?” Trust me, your walls are about to get a whole lot more interesting.
Mini Floating Shelf Gallery
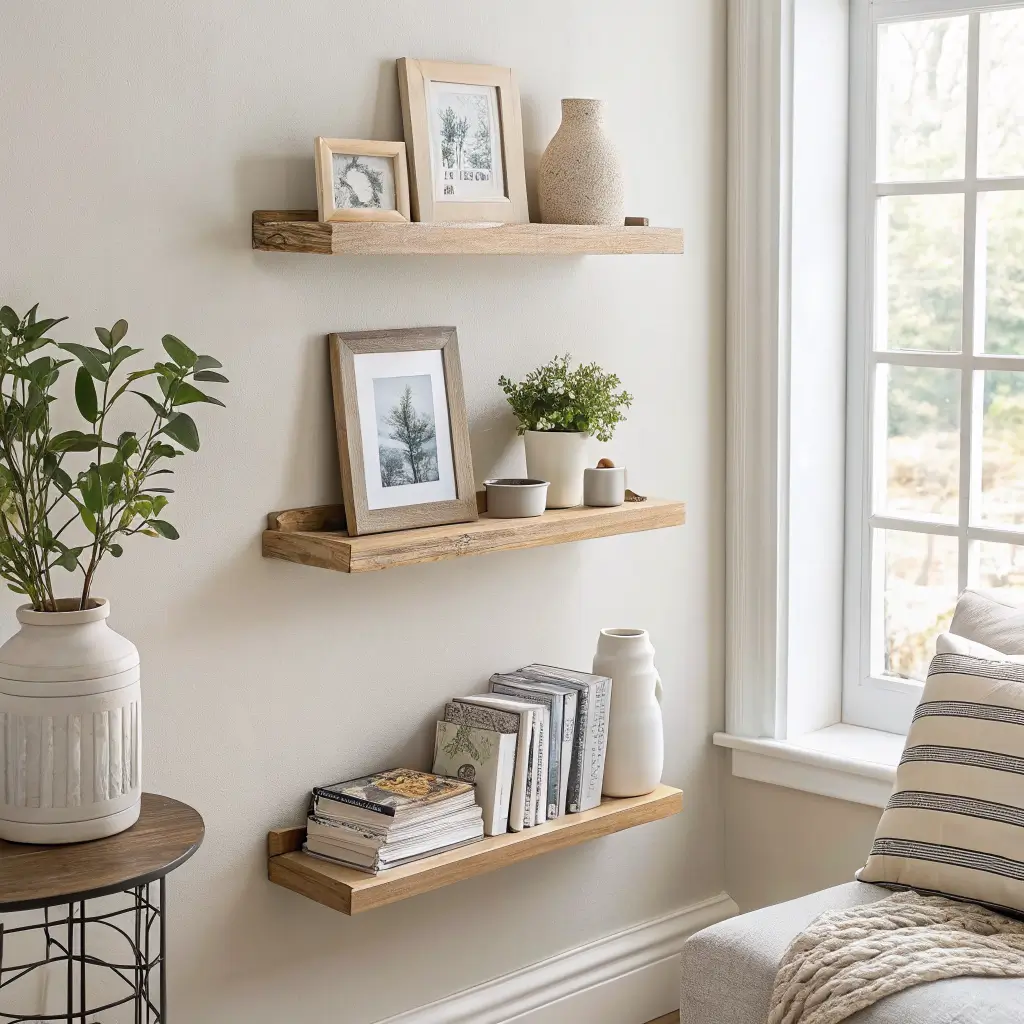
You know what’s criminally underrated? Those tiny floating shelves that barely stick out from the wall. I’m talking about the ones that are maybe 4-6 inches deep and look almost weightless when installed.
Here’s why I’m obsessed with mini floating shelf galleries: they give you the flexibility to constantly switch things up without putting new holes in your wall. I installed three of these bad boys in my entryway—staggered at different heights—and they’ve become my favorite spot to rotate seasonal decor, small plants, and those random pretty things you collect but never know where to put.
The secret sauce? Mix materials and lengths. Get one wood, one metal, maybe one white. Vary the lengths between 8 inches to 16 inches. This creates visual interest without overwhelming your wall space. Plus, when you arrange them at varying heights, your eye travels up and down, making the wall feel taller than it actually is. Clever, right?
I use mine to display everything from tiny succulents in ceramic pots to my vintage camera collection (yes, I’m that person). The beauty is that each shelf becomes its own little vignette. One week it’s holding my favorite candles, the next it’s showcasing postcards from friends. The rotation keeps my space feeling fresh without any heavy lifting.
Pro tip: When installing these, use a level. I cannot stress this enough. I learned this the hard way when my first attempt looked like the Leaning Tower of Pisa had babies on my wall. Not cute. Also, check your wall type—drywall anchors are your best friend if you’re not hitting studs.
Vertical Picture Ledge Stack
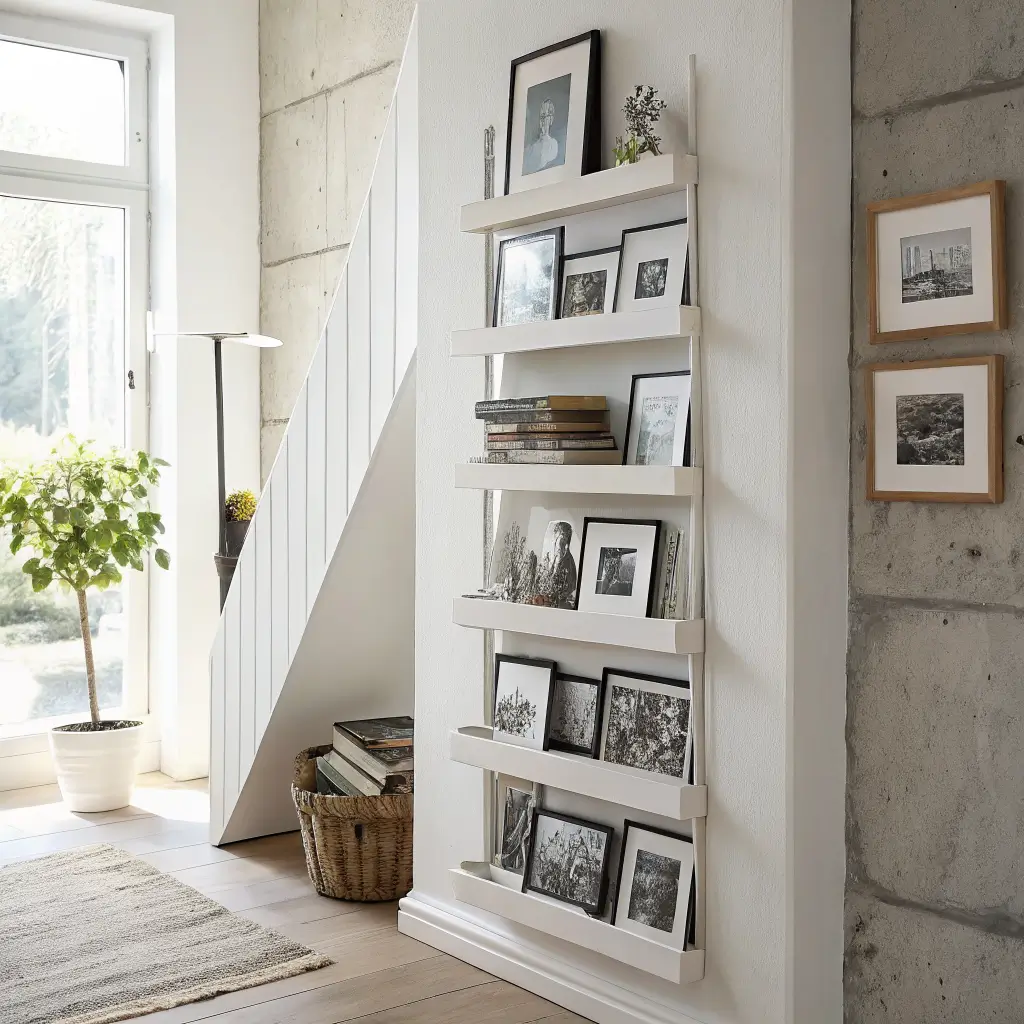
Picture ledges are having a moment, and honestly? They deserve it. But here’s where most people mess up: they install one lonely ledge and call it a day. Boring!
Instead, stack multiple narrow picture ledges vertically, spacing them about 12-18 inches apart. This creates this awesome gallery effect where you can lean frames, small art prints, and even decorative plates without the commitment of actually hanging them. Changed your mind about that print? Just swap it out. No hammer required.
I’ve got four ledges running down a narrow wall in my hallway—the kind of space that’s basically useless for anything else. Each ledge is only about 3 inches deep, so they don’t jut out into the walkway, but collectively they make a massive statement. I mix framed photos with small plants, a vintage book or two, and sometimes random objects that make me happy.
The psychological trick here is layering. When you place items in front of each other on these ledges, you create depth. Your wall stops being flat and boring and starts feeling dimensional and curated. FYI, this is basically how professional stylists make those Instagram-worthy shelfies happen. 🙂
What to put on them? Think variety. Mix frame sizes—4×6 with 5×7. Add some unframed art prints leaning against framed ones. Throw in a small potted plant or a decorative object that breaks up all those rectangles. The key is controlled chaos. You want it to look intentional but not stuffy.
And can we talk about how much easier this makes switching out family photos? Instead of wrestling with picture wire and getting frustrated with frames that refuse to hang straight (we’ve all been there), you just… move things around. Revolutionary.
Peel-and-Stick Accent Panel
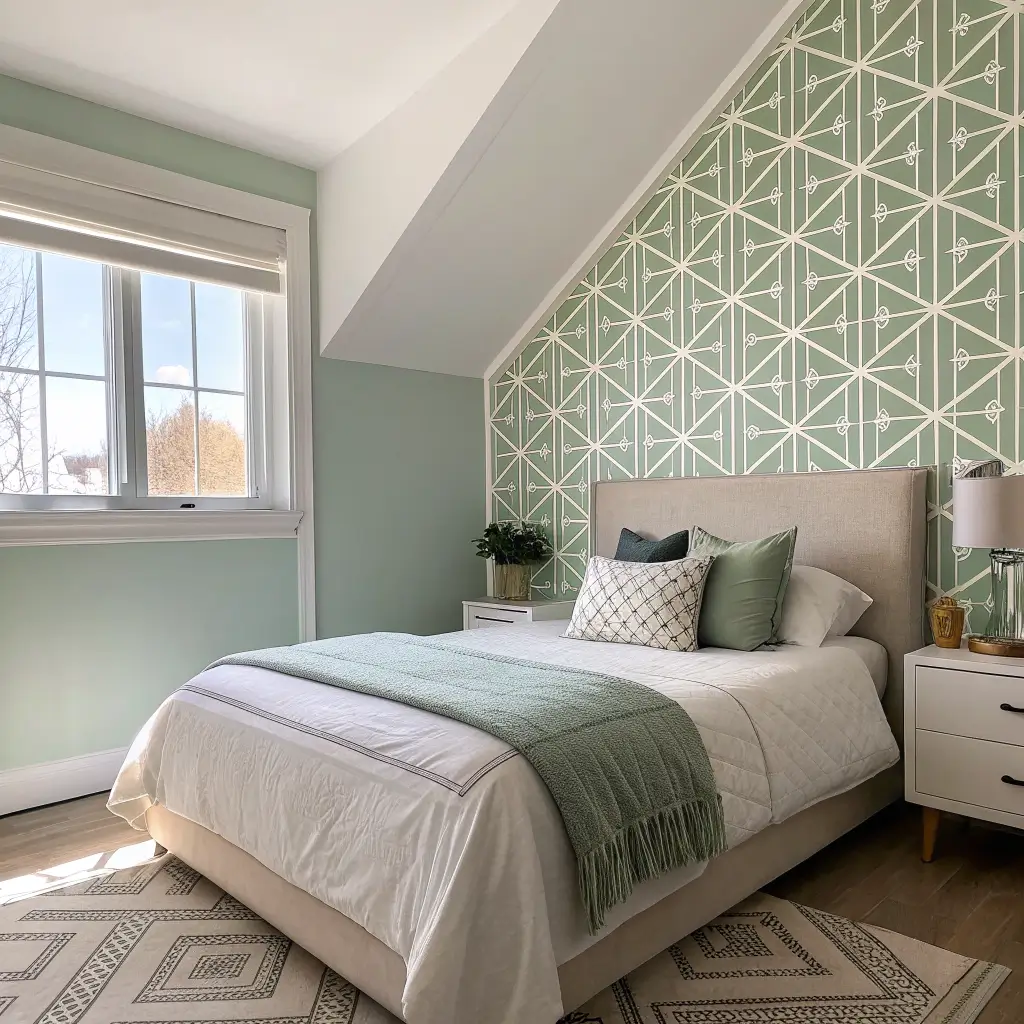
Okay, renters, this one’s especially for you—but honestly, homeowners, you’ll want to listen up too because this idea is ridiculously versatile.
Peel-and-stick panels have come such a long way from those tragic wallpaper disasters of the ’90s. I’m talking about modern, gorgeous options: faux brick, reclaimed wood, 3D geometric patterns, marble, textured grasscloth—the works. And the best part? They peel off cleanly when you’re done with them.
Here’s my move: identify a small wall section that needs personality—maybe behind your bed’s headboard area, or that weird narrow wall section in your bathroom. Instead of covering the entire wall (which can feel overwhelming in a small space), create a small accent panel. Apply the peel-and-stick material in a defined rectangle or square, essentially creating an architectural feature where none existed before.
I did this in my home office on the wall behind my monitor. I used a textured wood panel material in a 3-foot by 4-foot section, and it instantly made my Zoom background look professional instead of “I work from my spare bedroom” (which, let’s be honest, is exactly what’s happening).
Installation real talk: Clean your wall thoroughly before applying. Seriously. That dust you can’t see? It’s there, and it’ll make your panel bubble. I also recommend using a credit card or squeegee to smooth out bubbles as you apply each strip. Work slowly—this isn’t a race, and rushing leads to wonky seams that’ll haunt you every time you look at that wall.
The other genius thing about this approach? It defines spaces in open-concept areas. That accent panel creates a visual anchor that tells your brain “this is a distinct zone” without needing actual walls. Pretty smart for studio apartment dwellers, IMO.
Also Read: 10 Amazing Fabric Wall Decor Ideas for Stylish Interiors
Hanging Wall Planter Grid
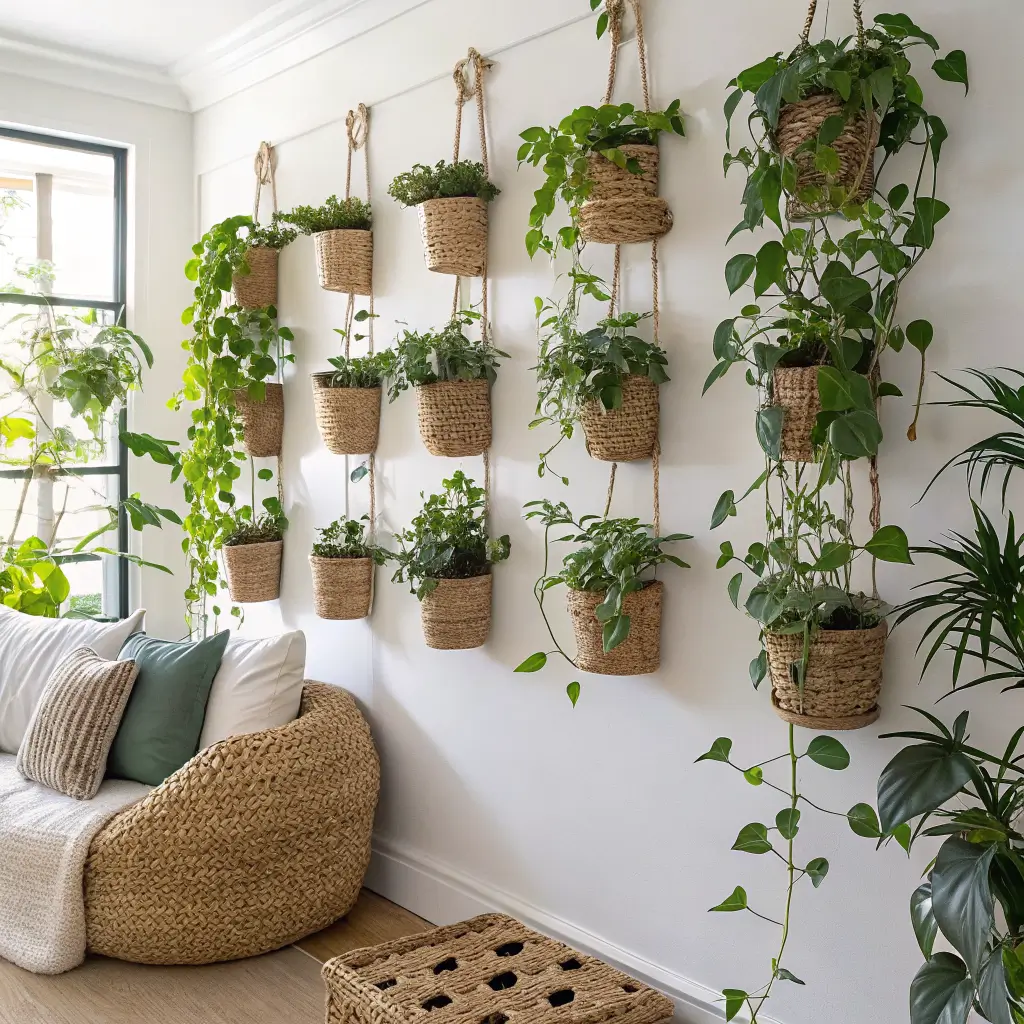
Plants make everything better—scientific fact, don’t quote me on that, but also totally true. The problem? Floor space is precious, and not everyone has room for a fiddle leaf fig forest.
Enter the hanging wall planter grid. I’m talking about installing a small geometric grid system (metal ones look especially slick) that lets you hang multiple small planters at different heights. Think of it like vertical gardening meets modern art installation.
I mounted a 2-foot by 2-foot brass grid on my kitchen wall—that awkward space next to the window that’s too narrow for cabinets but too visible to leave bare. Now it holds six small planters with herbs I actually use for cooking. Basil, mint, thyme… I feel like a domestic goddess every time I snip fresh herbs for dinner, and my guests think I have my life together. Win-win.
Here’s what makes this work in small spaces: The grid itself is architectural and interesting even without plants. So on those inevitable occasions when you forget to water and things get crispy (no judgment, we’ve all been there), the structure still looks intentional.
Choose planters that are uniform in style but maybe varied in size. I use small terracotta pots because they’re classic and let the plants be the stars. Some people go full matchy-matchy with ceramic white planters. Others mix metals. There’s no wrong answer here—just make sure whatever you choose has drainage or you’ll create a whole different problem involving root rot and sadness.
Plant selection matters too. For low-light areas, go with pothos or philodendron—those things are nearly indestructible. Bright spots? Succulents and herbs thrive. And if you’re like me and travel frequently, consider mixing in some quality faux plants. The good ones are shockingly realistic now, and nobody needs to know your secret. 😉
The visual impact of having plants at eye level instead of always looking down at them is surprisingly different. It brings life to your wall in a literal sense and creates this living, breathing art piece that changes as your plants grow. Pretty magical for something that takes up maybe six inches of wall depth.
Slim Wall-Mounted Desk Nook

Ever wished you had a home office but your square footage laughs at such luxurious ideas? Yeah, same. That’s why I’m borderline evangelical about slim wall-mounted desk nooks.
Picture this: a narrow floating desk—we’re talking 12 to 18 inches deep max—mounted to a small wall section. Above it, you install a pegboard, small shelving, or a combination of both. Boom. You’ve got a functional workspace that literally folds into your wall space.
I installed one in my bedroom on a wall that’s maybe 3 feet wide, squeezed between my closet and a window. The desk surface is barely deep enough for my laptop and a coffee cup, but that’s honestly all I need for checking emails and pretending to be productive. Above it, I’ve got a pegboard with hooks holding my headphones, a small basket with pens, and a tiny shelf with a plant (because apparently I can’t decorate anything without adding plants).
The beauty of this setup? When you close your laptop and tuck your chair under, it barely looks like a desk at all. It reads more as a decorative shelf moment with purpose. In small spaces, furniture that multitasks or disguises itself is pure gold.
Material-wise, you’ve got options. A simple wood slab with metal brackets can look modern and industrial. White laminate gives you that clean Scandinavian vibe. I’ve even seen people use reclaimed doors cut down to size for a vintage farmhouse thing. Match it to your existing aesthetic, or use it as an opportunity to introduce a new material that creates contrast.
Word of warning: Check weight ratings on your mounting hardware. Laptops, monitors, books—this stuff adds up fast. I learned this lesson when my first attempt resulted in a middle-of-the-night crash that scared me half to death. Use proper anchors, mount into studs if possible, and maybe don’t pile on your entire book collection.
Also, consider adding a small wall-mounted light above your nook. Task lighting makes the space actually functional rather than just decorative. I use a plug-in sconce with a swing arm—it was like $35 and makes my little desk corner feel legit.
Framed Fabric Swatch Art
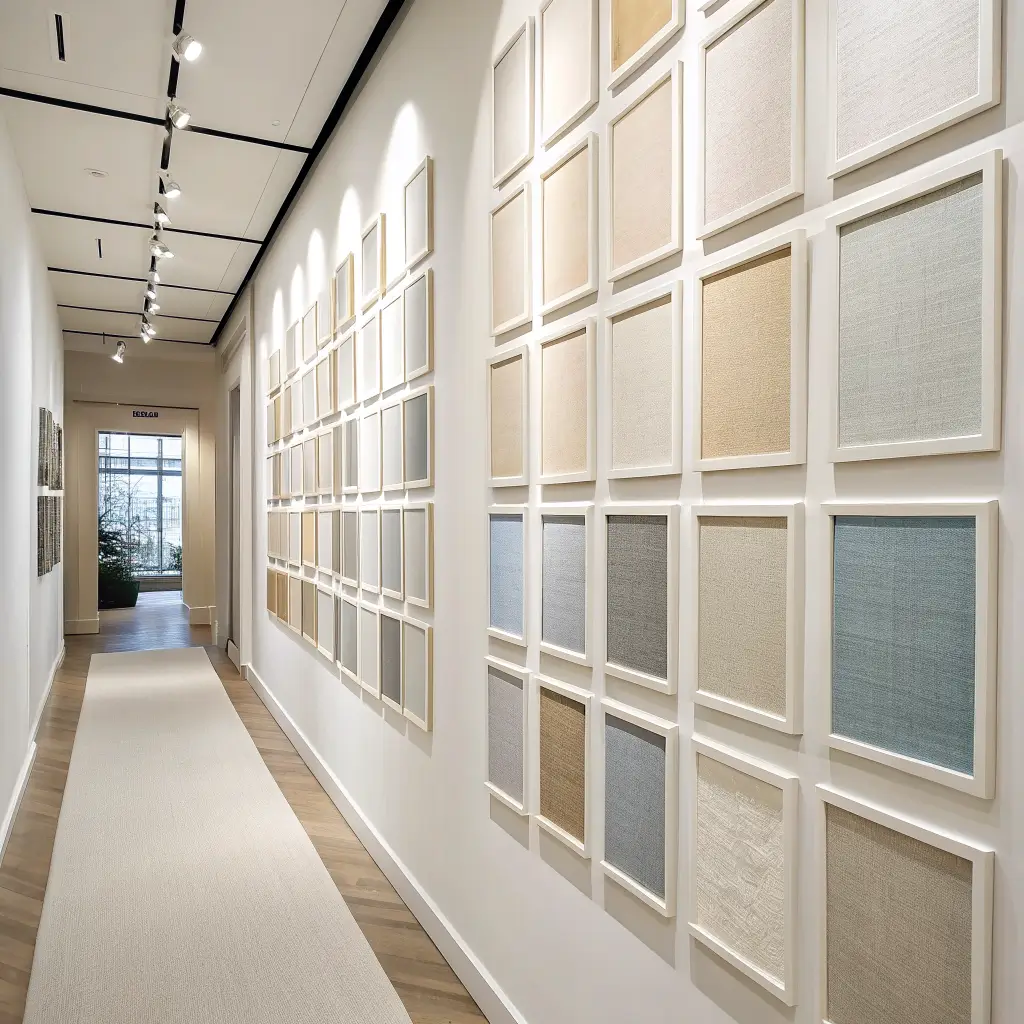
Okay, this one’s my secret weapon for fancy-looking art on a budget that would make actual art collectors weep with laughter. But here me out.
High-end fabric swatches—the ones from designer brands or unique textile artists—can be absolutely stunning. And you know what? A 12-inch square of amazing fabric costs WAY less than actual artwork. Frame it properly, and suddenly you’ve got sophisticated wall art that nobody realizes came from your local fabric store.
I raided the remnant bin at a fabric shop and scored some seriously gorgeous pieces: a William Morris reproduction print, some geometric modern fabric, and a textured linen in this perfect dusty blue. Total cost? Maybe $25 for all three. I bought matching frames (white, clean, simple), and arranged them in a tight grid on a small wall in my living room.
The result? People assume I spent hundreds on art. The texture and pattern of quality fabric gives these frames so much visual interest and depth. Plus, if you choose fabrics with colors that tie into your room’s palette, they pull your whole design scheme together in a way that feels cohesive and intentional.
Here’s the fun part: you can theme your fabric choices. Going for bohemian vibes? Look for suzani prints or ikat patterns. Want something minimalist? Textured neutrals like raw linen or canvas. Feeling bold? Geometric or abstract contemporary prints. The fabric store is basically an affordable art gallery if you squint at it right.
Framing tips: Use mat boards to create space between the fabric and the frame edge—this elevates the whole look from “craft project” to “art installation.” I actually bought pre-cut mats to fit standard frame sizes because custom matting gets expensive fast. Stretch the fabric taut across sturdy backing board (I use foam core from the craft store), secure it with pins or fabric adhesive on the back, and frame as usual.
Another cool move? Mix fabric art with actual prints or photos in the same frame style. This creates visual variety while the uniform frames tie everything together. Your eye reads it as an intentional collection rather than random stuff slapped on a wall.
Also Read: 10 Modern Wooden Wall Decor Ideas for Stylish Interiors
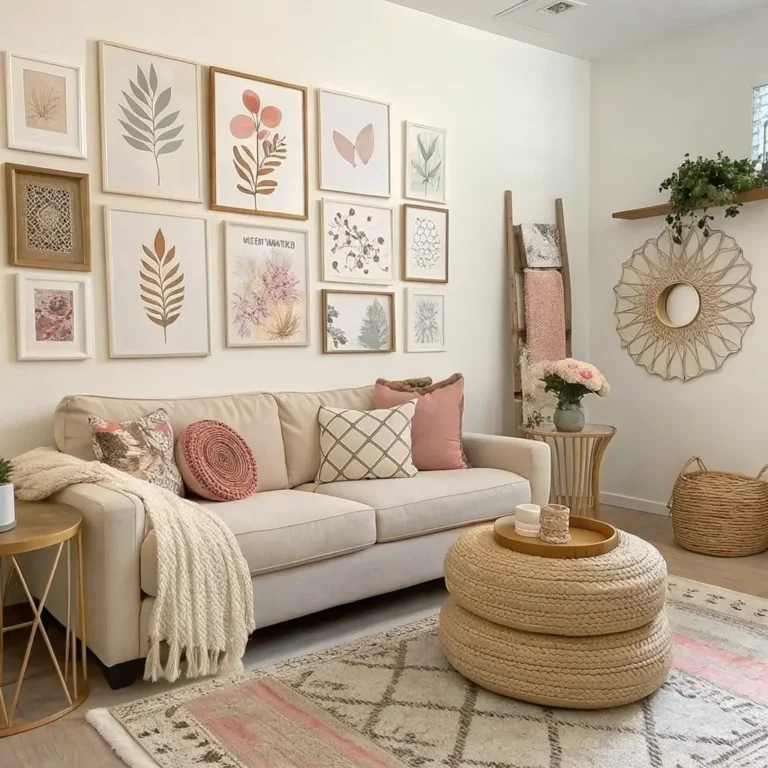
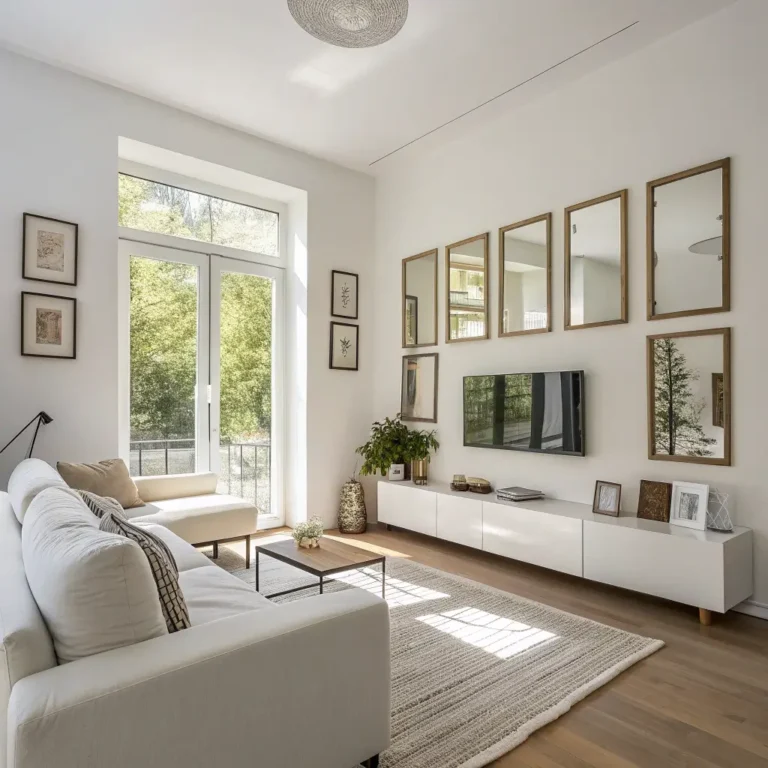
Compact Mirror Cluster Wall
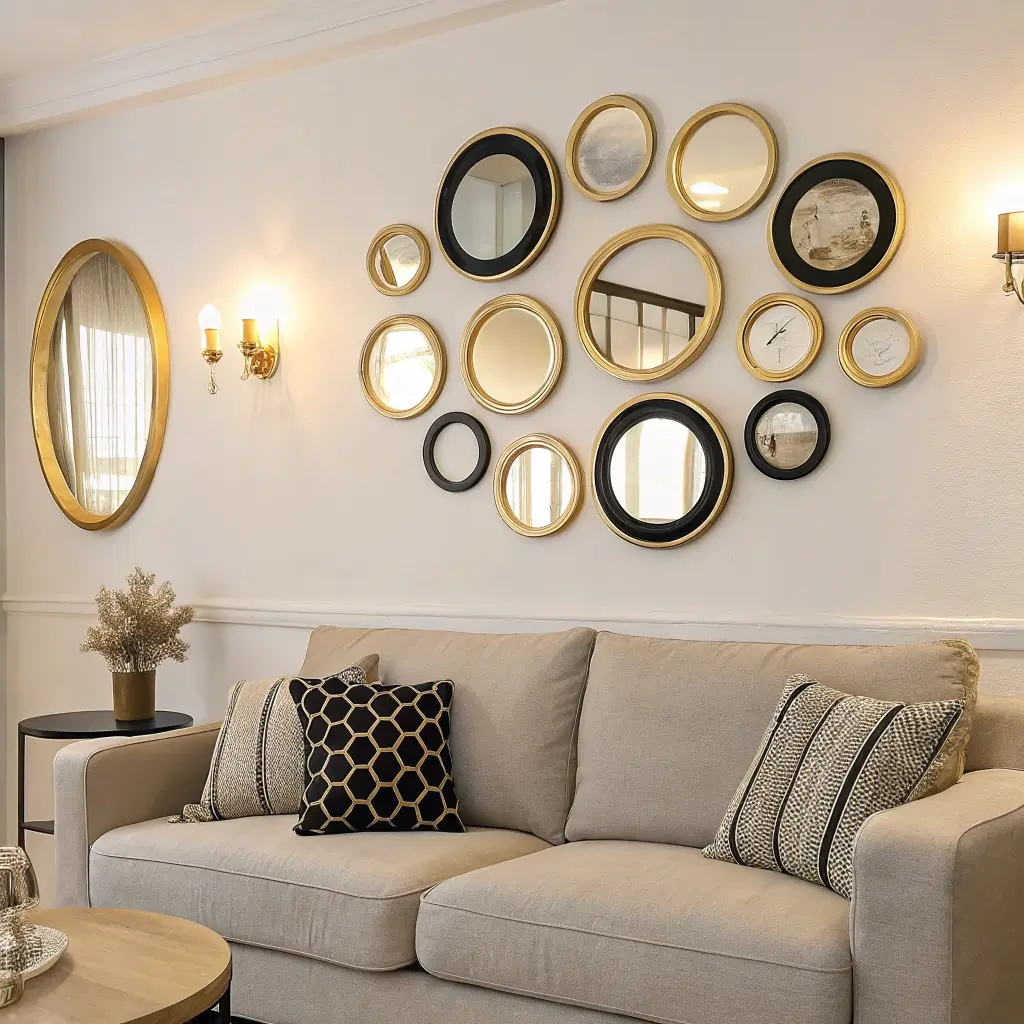
Let’s talk about mirrors for a sec, because they’re low-key the most underrated decor tool out there. They reflect light, make spaces feel bigger, and create visual interest—basically the trifecta of small-space solutions.
But instead of one medium mirror doing all the work, try creating a cluster of small mirrors in varying shapes and finishes. I’m talking about grouping maybe 5-7 mirrors ranging from 4 inches to 10 inches in diameter, mixed shapes (round, hexagonal, starburst, rectangular), and different frame finishes (brass, black, natural wood, maybe one or two frameless).
I installed a mirror cluster on a narrow wall section near my entryway, and it’s become this unexpectedly cool focal point. The varied shapes create visual rhythm, and because they’re all different sizes, your eye bounces around in an interesting way. Plus, the reflected light from different angles makes the space feel brighter and more open.
Layout strategy: Before committing to nails and holes, trace each mirror on paper, cut out the shapes, and tape them to your wall. Live with the arrangement for a day or two. Move pieces around until the composition feels balanced but not symmetrical. You want controlled asymmetry—organic and interesting, not chaotic.
The key to making this look cohesive instead of messy? Stick to a limited color palette for the frames. I went with all brass and black finishes, which gives variety without looking random. Some people go all gold, all wood, or all frameless. The constraint actually creates harmony.
Installation real talk: This involves multiple wall anchors, so if commitment scares you, maybe sit this one out. Or use command strips if your mirrors are lightweight—I’ve done this successfully with acrylic mirrors under a pound each. Just make sure to clean the wall really well first and let the adhesive cure for the recommended time before hanging.
The functional bonus? Quick makeup checks, last glimpse before leaving the house, and the ability to check whether you have food in your teeth from multiple angles. Practical AND pretty.
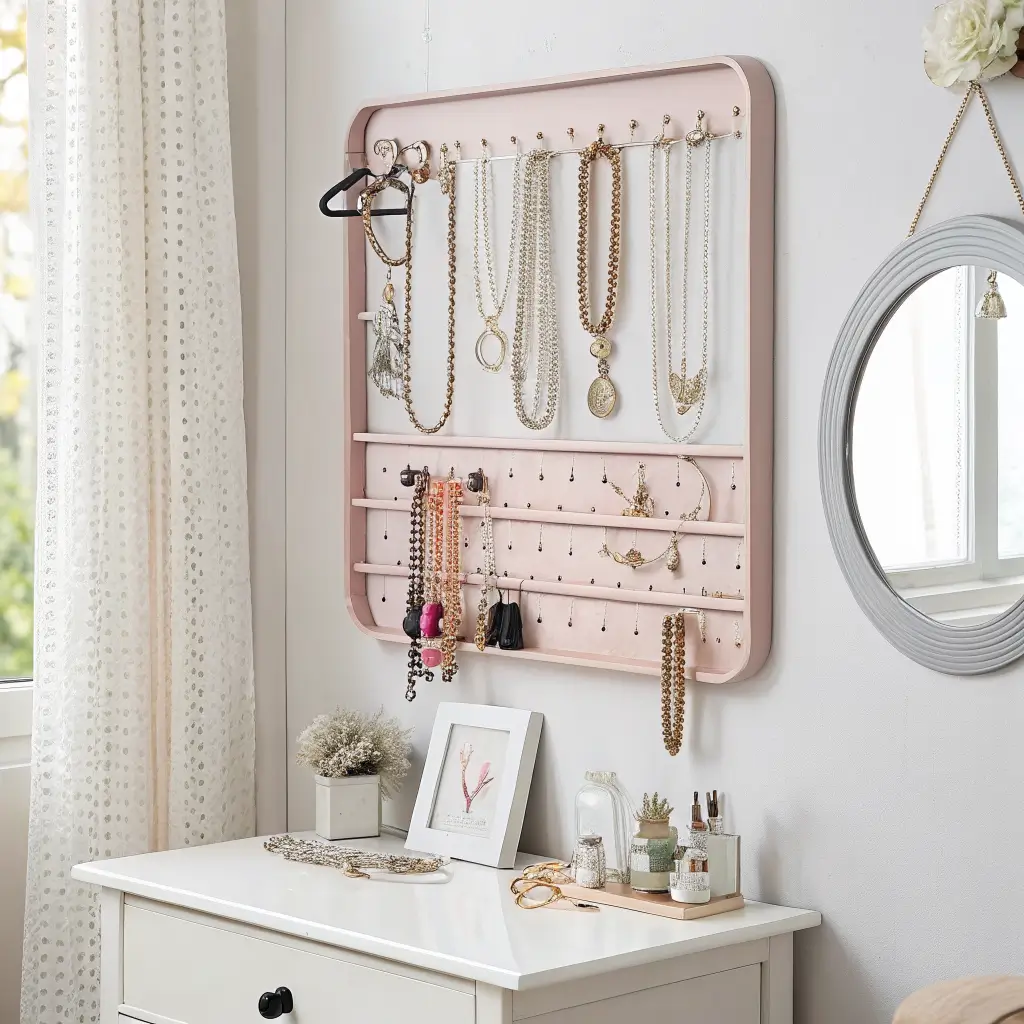
Wall-Mounted Jewelry Display
Can we address the jewelry storage struggle for a moment? You’ve got necklaces tangling themselves into impossible knots in a drawer, earrings disappearing into the void, and that one bracelet you love but never wear because you literally forget you own it.
What if I told you that your jewelry could BE your wall decor? Revolutionary, I know. :/
I’m talking about installing a decorative wall-mounted jewelry display in that small wall space in your bedroom or closet. This could be a small peg rail with brass hooks, a vintage frame with mesh or chicken wire stretched across it, a small floating shelf with integrated hooks, or even just a series of beautiful individual hooks arranged artistically.
Here’s why this works: your jewelry is actually beautiful. Those necklaces deserve to be seen, not buried. When you can see what you own, you actually wear it more often (speaking from experience here—I rediscovered half my jewelry collection when I made this switch).
I installed a 2-foot brass peg rail on the wall next to my dresser. It holds maybe 15 necklaces, and underneath I mounted a small floating shelf where I keep a jewelry tray for rings and earrings. The whole setup takes up maybe 3 feet of wall space, but it’s become one of my favorite decorative elements in the room. The necklaces create these pretty cascading metal and bead lines, and the morning sun catches them in a way that makes me stupidly happy.
What to hang: Obviously necklaces are the stars here, but bracelets work too. Earrings can hang on smaller hooks or a mesh surface. I keep my rings in a small dish on the accompanying shelf because dangling rings just looks weird, and let’s be honest, they’d probably fall off hooks anyway.
Style-wise, you’ve got options. Want modern? Go with sleek metal hooks or a minimalist rail. Prefer vintage? Hunt for an ornate frame at a thrift store, paint it a fun color, and stretch decorative wire or lace across the back. Bohemian? Macramé jewelry hangers are having a moment and look gorgeous layered on walls.
The practical benefits are real: No more tangled necklaces (hallelujah), easy access when getting dressed, and you can actually see what you own. The decorative benefit? It’s personalized art that reflects your actual style. Plus, if you’re like me and occasionally buy jewelry as souvenirs, this becomes a visual travel diary of sorts.
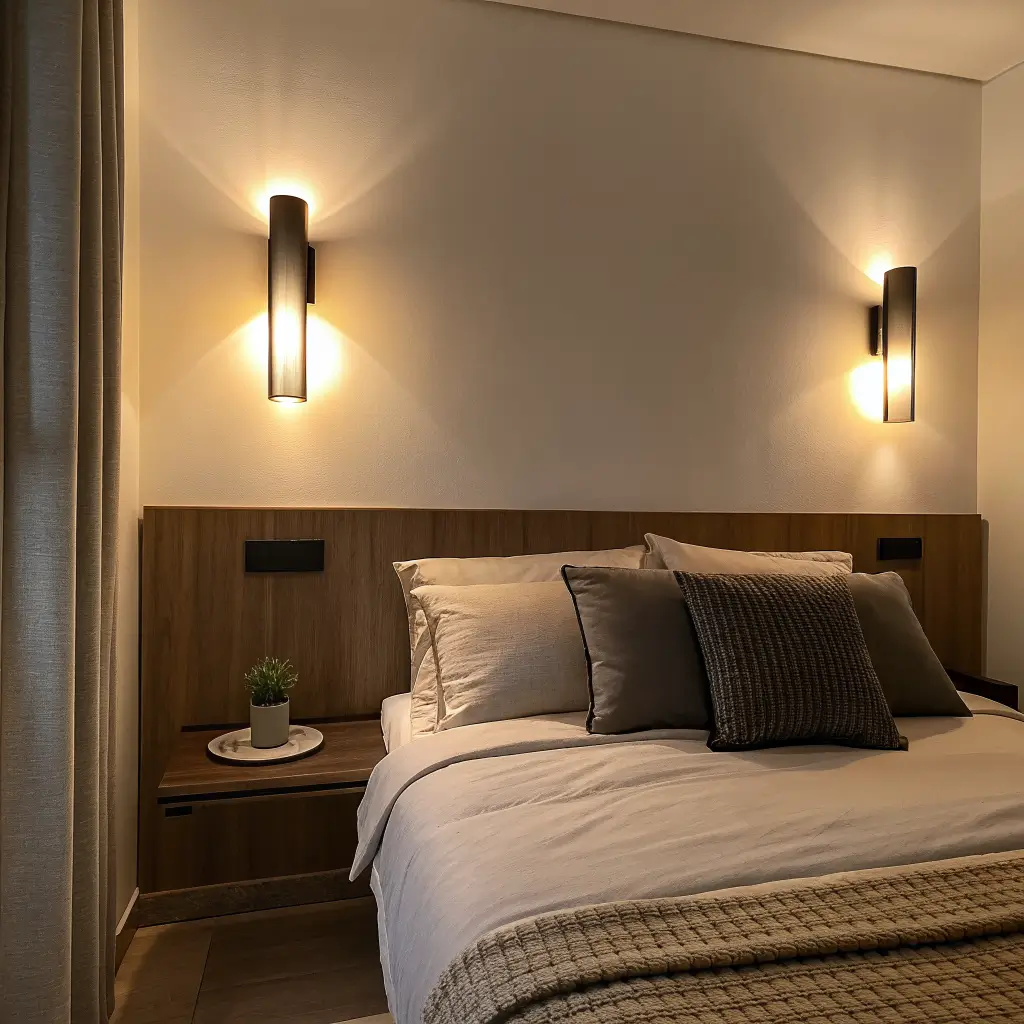
Narrow Decorative Wall Sconces
Lighting is everything, and yet we often treat it as an afterthought. Wall sconces—especially narrow decorative ones—are absolute game-changers for small wall spaces.
I’m not talking about boring builder-grade fixtures here. I mean beautiful, statement sconces that provide ambient lighting AND serve as sculptural art pieces. Think brass candle-style sconces, modern linear LED fixtures, or those trendy plug-in swing-arm lamps that look like they belong in a Parisian apartment.
Here’s what’s great about sconces in small spaces: they provide light without taking up floor or surface space. That matters when you’re working with limited square footage and every tabletop is already maxed out. They also draw the eye upward, which makes ceilings feel higher and rooms feel larger.
I installed a pair of brass candle sconces flanking a small mirror in my bathroom—a wall space maybe 2 feet wide. The sconces themselves only project about 5 inches from the wall, but the impact is dramatic. The warm candlelight (yes, I actually use candles in them sometimes because I’m fancy like that) creates ambiance, and even when not lit, they add this classic architectural detail to an otherwise boring builder-grade bathroom.
Hardwired vs. plug-in: This is the big decision. Hardwired sconces require electrical work (hire a pro unless you’re confident in your skills—electricity isn’t something to DIY casually). Plug-in sconces are renter-friendly and way easier to install, but you’ll have a visible cord to deal with. I’ve done both. For the bathroom, I hired an electrician. For my bedroom reading sconces, I went plug-in and ran the cords behind a bookshelf. Problem solved.
Style selection matters. Your sconces should complement your existing decor without matching exactly (matchy-matchy is outdated, friends). I love mixing metals—my bathroom has brass sconces, but my faucet is chrome, and it works because there’s enough brass elsewhere in the room to tie it together.
Consider the practical lighting needs too. Reading nook? You want adjustable swing-arm sconces with focused light. Ambient mood lighting? Go for upward-facing or frosted glass sconces that create a soft glow. Task lighting for a hallway? Downward-facing with brighter bulbs.
Pro tip: LED bulbs are your friend here. They last forever, run cool (important when we’re talking about narrow spaces where you might brush against them), and come in various color temperatures. I’m team “warm white” all the way—that cozy 2700K glow makes everything feel like a hygge dream.
Also Read: 10 Creative Staircase Wall Decor Ideas and Modern Charm
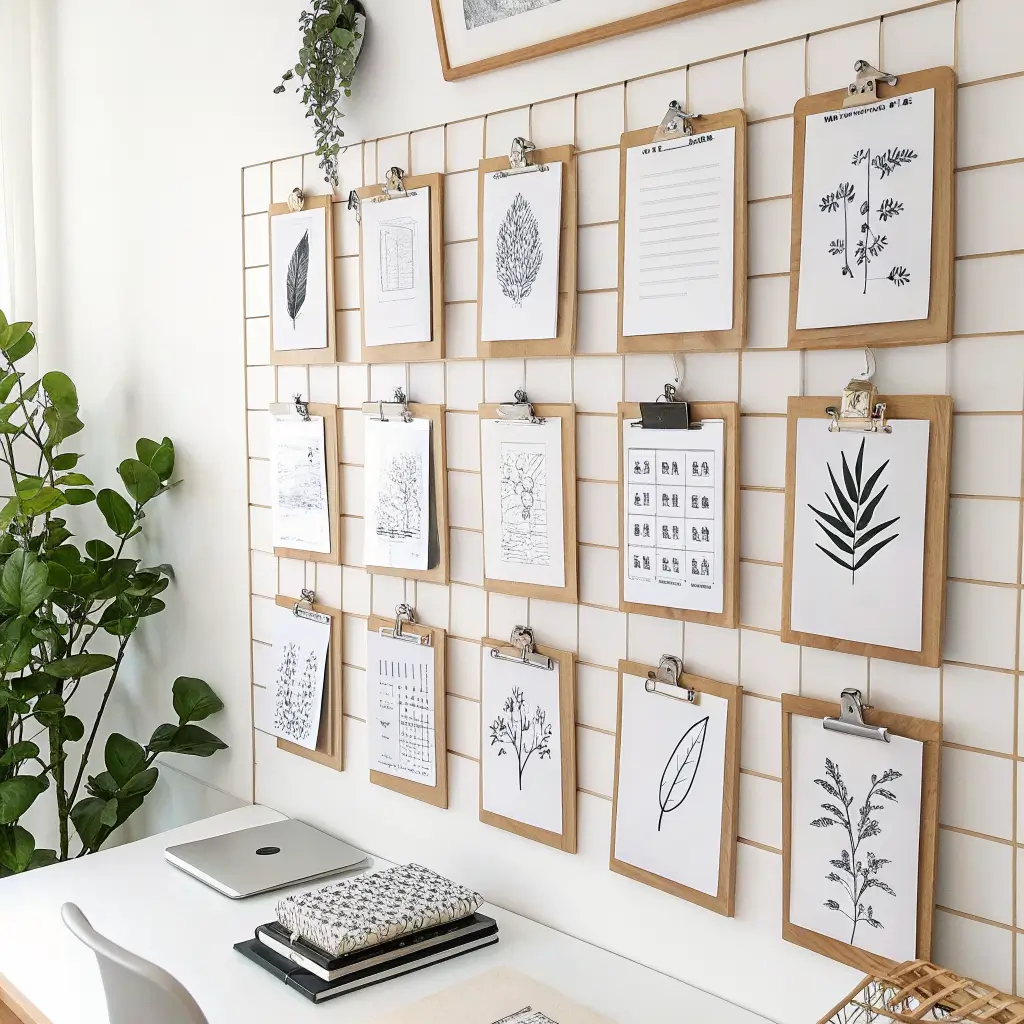
Clipboard Art Rotation Wall
Okay, this last one might sound weird, but stick with me because it’s brilliant in its simplicity and flexibility.
You know those basic wooden or metal clipboards? The ones that cost like $3? Hang a series of them on your wall—maybe 3 to 6 depending on your space—and use them to rotate artwork, prints, photos, kids’ drawings, inspirational quotes, or whatever visual content makes you happy.
Why am I so hyped about this? Because it’s the ultimate low-commitment, high-flexibility wall decor. Changed your mind about that print? Swap it out. Kids brought home new masterpieces from school? Easy rotation. Found a cool magazine page you want to display temporarily? Clip it up. You’re basically creating a curated, constantly evolving gallery without putting new holes in your wall every time your taste or mood changes.
I’ve got five clipboards mounted on a narrow hallway wall—the kind of pass-through space where you’re not spending tons of time but see frequently. Three are wood, two are brass, all different sizes (ranging from 5×7 to 9×12). I change out the contents seasonally, or sometimes weekly if I’m feeling ambitious.
What to display? Literally anything flat. I’ve used postcards, vintage book pages, my kid’s artwork (yes, that phase where everything was just scribbled purple happened), inspirational quotes I printed, photos from vacations, pressed flowers and leaves, fabric swatches I’m considering for other projects, even recipes I want to try. The variety keeps the space feeling fresh and personal.
The installation is stupid simple—mount the clipboards to the wall using command strips (for lightweight options) or small nails. Arrange them in a grid for a structured look, or scatter them at different heights for something more organic and casual. I went with an asymmetrical arrangement because it feels more dynamic and less “elementary school classroom” (no shade to teachers—you’re angels—but I wanted a grown-up vibe).
Styling tip: Even though the content rotates, keep the clipboard frames themselves cohesive. All wood, all metal, or all one color. This creates visual consistency even when the clipped content is varied. Otherwise, it can start looking chaotic rather than curated.
The beauty of this approach is how it embraces change rather than fighting it. Instead of stressing about finding THE perfect art that’ll look good forever, you’re creating a system that celebrates the temporary and evolving. It’s like the capsule wardrobe concept but for your walls. Plus, it makes displaying sentimental items easy—that sweet note from your partner, the drawing from your niece, the ticket stub from an amazing concert—all get their moment in the spotlight before rotating to a memory box.
Wrapping This Up
So there you have it—ten small wall decor ideas that prove you don’t need massive spaces to make a big impact. Whether you’re working with awkward architectural quirks, narrow hallways, tiny nooks, or just that one wall that’s been stumping you for months, there’s something here that’ll work.
The common thread through all these ideas? They’re about being intentional with small spaces rather than seeing them as limitations. That narrow wall isn’t a design problem—it’s an opportunity to create a focused moment of interest. That weird sliver of space isn’t wasted footage—it’s perfect for a slim desk nook or vertical planter grid.
Start with one idea that resonates with your space and style. You don’t have to tackle everything at once (in fact, please don’t—that way lies chaos and regret). Pick the solution that solves your most annoying wall space challenge, and go from there. Maybe it’s finally organizing your jewelry with that wall display, or creating a functional workspace with a mounted desk, or just adding some life with a planter grid.
And remember: mistakes are temporary. That’s the beauty of rental-friendly solutions, peel-and-stick options, and clipboard systems. If you hate it, you can change it. Try stuff. Experiment. Your walls can handle it.
Now, if you’ll excuse me, I need to go rearrange my clipboard wall because I found some new prints that are demanding attention. Happy decorating, friends!